I still remember unboxing that little wooden kit I bought on Etsy: it was my first laser-cut fairy house, designed to be part of my springtime fairy garden display. That kit became a journey of using my imagination and using materials to decorate a little house that I had never used before.
In this article, I’ll share how I built it, what surprised me along the way, and how I even weatherproofed it, so it can now sit proudly in my fairy garden, yes, outside! I’ll link to the exact kit I used so that you can find it too.

Check out more designs of fairy houses by ElchamyEngraving here.
Updated 31/08/25
As an Amazon, Etsy and Anavrin associate, I earn a small commission from your purchase, with no extra charges for you.
First impressionas and prep work on this fairy house kit
When the kit first arrived, my first thought was how sturdy and pretty all the laser-cut pieces looked. The fairy house parts by AlchemyEngraving came neatly packed, with all the tiny details already cut into the wood.
Before I even thought about assembling it, I gave the whole lot a few protective layers of Mod Podge Outdoor, and even some ship’s varnish.
Since my plan was to place this fairy house in the garden, I didn’t want the first bit of rain to undo all my work. I brushed on several thin coats, front and back, and let them dry properly before moving on.

I’d definitely recommend this step if you’re planning to keep your kit outdoors. Even if you don’t, or only just for a while, sealing the pieces makes the colors last longer and prevents warping.

Mod Podge Waterbase Sealer, Glue and Finish for use Outdoors
Buy Now →
Assembling the fairy house and decorating it.
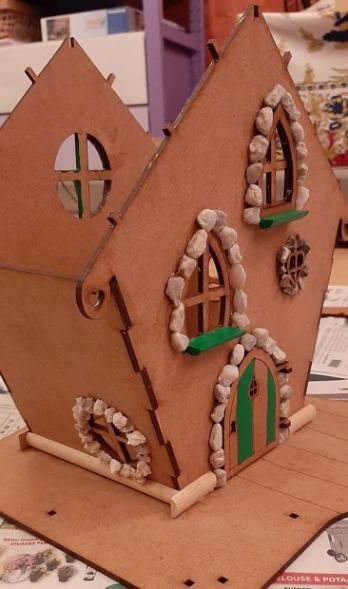
After everything was dry, I just started to assemble it. Now you càn just assemble it without using glue, as this system has the tab-and-slot method, but I did use extra Mod Podge outdoor glue, as it works as well as a sealer as a glue!

The process of assembling this kit was the easiest one I have ever encountered; everything fitted perfectly!

After assembly, I painted the windows and doors in the colors of my choice and got these little stones at the hardware store.
Again, I used Mod Podge glue to attach the stones to the walls!
In a corner, under the rooftop, I added a little birdhouse from cork, and I just drilled a little hole in it with my Dremel .
To finish it off, I added a small mailbox. And added a windowsill on one window on the left of the house.
After this, you can finish it anyway you like. Do you want roof slats, a tatched roof, or just use fake greenery as I did in this case? It is totally up to you!
I used the latter for this fairy house, but created wooden slats for my third house, and even just flat stones for my second house.
And here’s the final result, I have filmed the complete process in my YouTube video from start to end! You can watch it if you ever get bored – lol!
Overall, this project was fun, sturdy, and I love the way it handles itself outdoors in my fairy garden!
Check out more designs of fairy houses by ElchamyEngraving here.
My Final Conclusion
I really enjoyed making this fairy house and how easy it was!
Do you have any questions about this miniature kit or would you like to chat some more about dollhouses and miniatures? Then please leave a comment below or join my newest Facebook group.
Happy crafting!
Best regards,
Lizzy

Hi everyone!
My name is Lizzy, and I am an amateur miniaturist obsessed with everything in the dollhouse and miniature world, ever since I was a teenager.
So far, I have created 2 dollhouse projects, a backyard shed and a miniature treehouse, tons of DIY dollhouse kits, and “hacked” some.
I also created a fairy garden, and lots of small and simple miniature projects on my YouTube channel. (mostly made from trash or everyday items).
I love to write as well about all things happening in the miniature world, hence the reason why I created this blog!
I wish you happy reading and crafting!
Lizzy


These are adorable! I love making doll houses, and these remind me of fairy houses. My daughters and I use crafting as a pass-time. Fairy houses are one of our favorite types of crafts. These are very creative and look absolutely amazing! Do you make any fairies? Have you thought of providing fairy furniture?
Hi there,
Thank you, they sure are adorable! I don’t make fairies yet, maybe in the future or I will buy them on Etsy. Oh yes, fairy furniture I am going to make myself as well, keep an eye on my site and the category ‘personal’ work! 😉
Happy crafting,
Lizzy