My previous blog post, where I talked about turning trash into treasure projects before, got a bit too long and cluttered, so here is where I start part 2.
Just use little ‘silica’ bags (the ones that keep your stuff dry), open them up, and paint them with acrylic paint. Glue some real twigs to them with fast-grab tacky glue.
How to make a miniature book?
In this second DIY crafting video, you can see how I made a miniature book from scratch. The cover of the mini-book was an image that I found online and I edited it with Canva to make it in a miniature scale of 1:12.
I hope that you will enjoy it! If you do, please subscribe to my channel and “like” my video, thanks!
Click on the picture below to take you to the tutorial.
And there is another video, my YouTube- channel is going to be big!
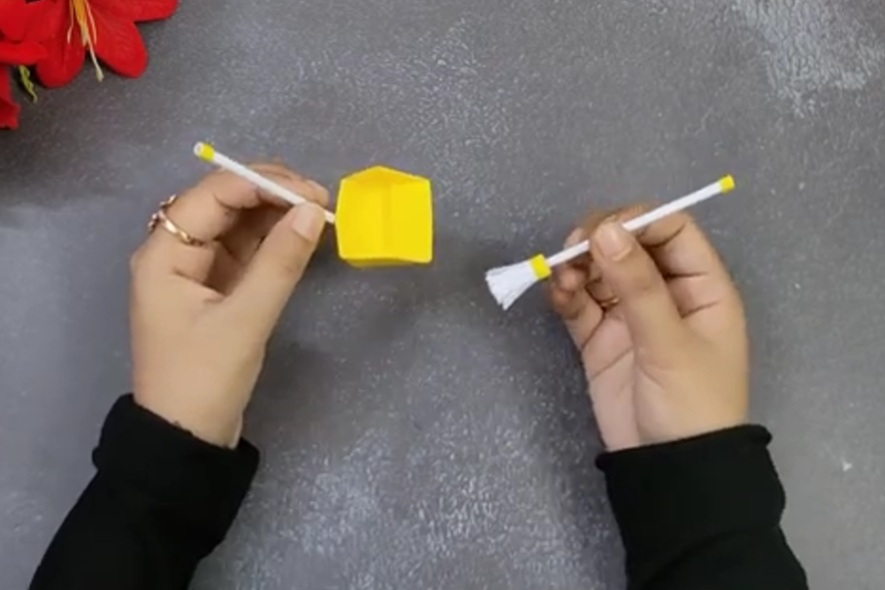
The next one below explains how to make an easy DIY miniature broom + dustpan, just by using paper, crafting glue, and scissors!
Again, please click on the image below to take you to the tutorial!
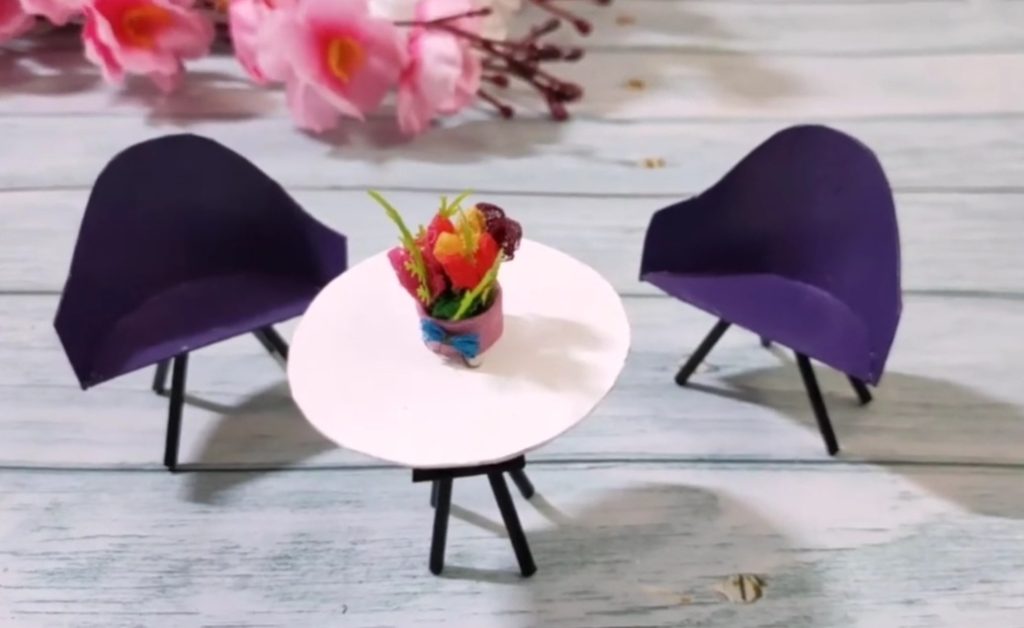
How to make modern miniature furniture with cardboard and skewers?
And more miniature furniture, but a quite modern style!
What you need is:
Thick cardboard paper
sandpaper
a solid skewer
a fast sticking glue or any strong glue
acrylic paint, any color of choice, I use black and purple
a crafting knife
a paintbrush all!
Just click on the picture below to get you to the actual instructional video!
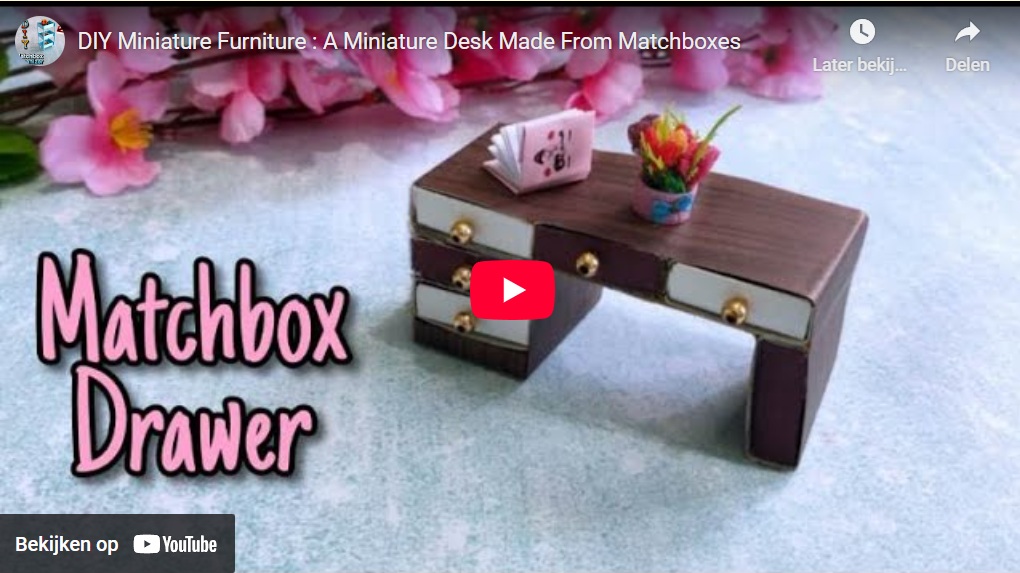
How to make a miniature drawer with the help of matchboxes?
And how about working with matchboxes?
What I have used is the next materials (you can adjust this to your liking) :
6 empty matchboxes
crafting glue
cardboard
self-adhesive decorative film (large enough to cover the whole project)
scissors
a brown marker
golden beads
That’s it! Just follow the instructions of the video below (click on the image to take you to it) and I’m sure you will manage 😉
How to make a DIY miniature fireplace from popsicle sticks
What you need is :
– popsicle sticks
– crafting glue or wood glue
– a crafting knife
– a pencil
– a metal ruler
– sandpaper
– some paper tape
There you go, just follow the instructions in this video and you will manage! ( I will add this later to my treehouse, decorated or painted of course ) If you like this little video, please give it a thumbs up and subscribe to my channel, thank you!
Make a Paper Miniature Christmas Tree
This easy miniature paper origami Christmas tree is perfect for your little dollhouse! It’s simple to make and perfect for a festive decoration.
Don’t let the cold weather keep you from celebrating Christmas!
This miniature paper origami Christmas tree is the perfect way to get into the Christmas spirit.
It’s easy to make and requires just a few simple steps.
What you need is:
(origami) paper
scissors
a bead
crafting glue (no glue needed for the tree itself!)
That’s it! If you like this video, please give it a “thumbs up” and subscribe to my channel for more coming up soon!
Make plumbing fixtures
From bendable straws and paint them with silver acrylic spray.
A sword.
Just use nail polish on a plastic cocktail stick to make it look like a real sword. The guard is part of the plastic pull-out thing from the top of an olive oil bottle.
How to create a DIY miniature furniture wardrobe.
Here is a slightly ‘bigger” project: a DIY miniature furniture wardrobe, made from popsicle sticks.
Just a reminder: these are always a ‘rough version” of a miniature piece, you can sand/paint them, and in this case, you can buy miniature hinges instead of the clear tape! ( I have run out, so I’m going to buy miniature hinges as well).
So for the rough version, you only need:
– popsicle sticks
-crafting glue
– clear tape
– a cutter
That’s it! Just follow the instructions in the video and done!
Now, if you are going to paint this, I would sand and paint the pieces beforehand. But now you have the basic DIY building plans for this miniature furniture;-)
Drums.
Or you could make drums with corks, the possibilities are endless! (Do you have any ideas regarding corks and making miniatures?)
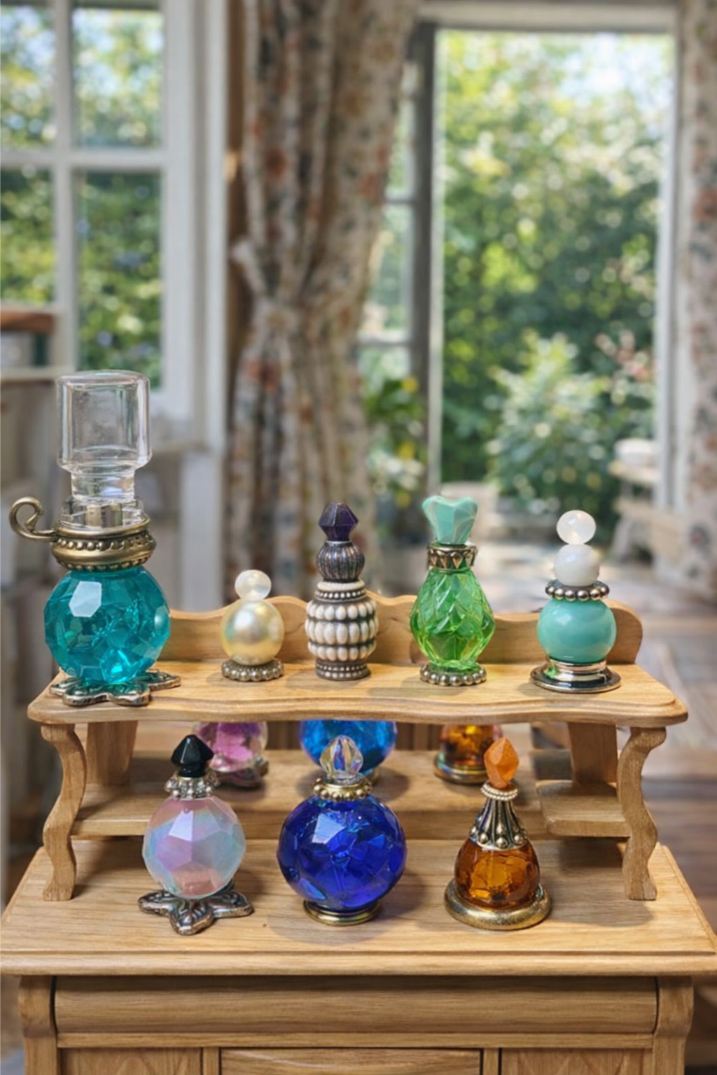
Perfume bottles.
Make a lamp or perfume bottle, simply by gluing beads together.
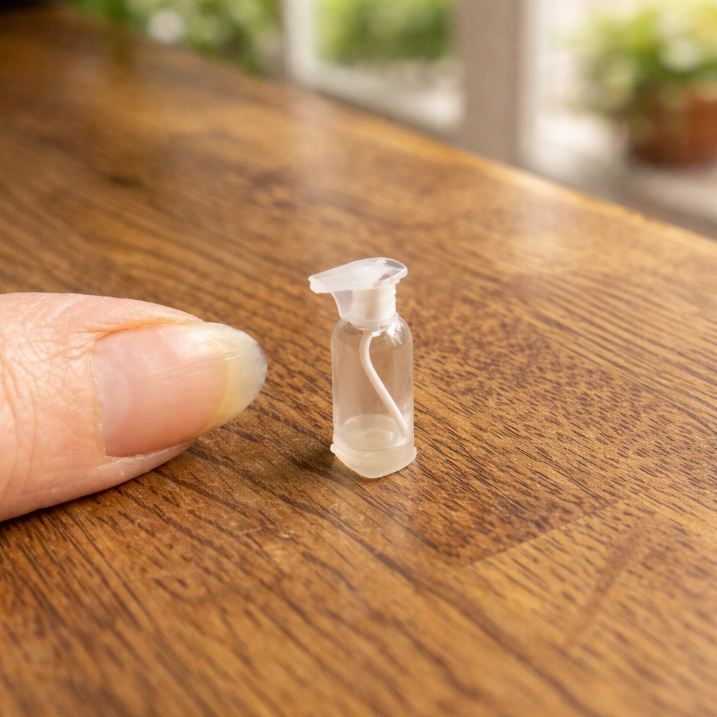
A cleaning spray.
This spray bottle for cleaning is made from a pill capsule. Make a whole in the largest part and insert a paperclip. Cut a little piece of a pen and glue it on top. Form the rest of the little spout with baking paper and fix it on the pill. There you go.
A Dremel toolkit.
A lady on my Facebook group made this little Dremel toolkit.
She used a dental floss container, cut in half along the manufacturer’s mold half-lines, it closes tightly.
The floor is made from a piece of basswood, cut, sanded, and drilled to fit the interior.
A small square dowel is used to cut the insets, and an Xacto knife to mark the grooves for the bits, and then widened with a real knife.
The bits are cut headpins, and various crimp beads are used. While the Dremel itself is bought, she is going to remake it, because it is too small.
The buff pad is made from real sandpaper, and a cotton tip cut from a baby’s Q-tip.
How To Create a DIY Miniature Table From Popsicle sticks?
In the next tutorial, I made a “quick” DIY miniature table, created totally from popsicle sticks, so you could consider this “popsicle art” haha.
What you need is;
– popsicle sticks
– an X-Acto knife aka a crafting knife
– a piece of paper tape
– crafting glue
sandpaper
– sturdy scissors
That’s it! Just follow the instructions in the video as usual!
How To Create A colorful DIY miniature Chair from plastic straws and cardboard
Here, we have created this colorful DIY miniature chair made from straws.
This would be best suitable for the 1:12 scale or 1:6 scale, depending on the scale you are working on. I don’t see these working on a scale of 1:24, would you?
What do you need for this project?
straws. (not always available anymore worldwide, but you might still have some )
a glue gun
acrylic paint
a piece of cardboard
scissors
a paintbrush
That’s it! As usual, just follow the instructions in the video and I’m sure you will succeed 😉
If you like this video, please give it a thumbs up and subscribe to my channel, thank you!
All by just using popsicle sticks! As usual, just follow the instructions of the video and you can paint them as you wish 🙂
So what you need is:
popsicle sticks
crafting glue
a pencil
a crafting knife
That’s all! So can you create miniatures? Yes, you can! If you like this video, please give it a “thumbs up” and subscribe to my channel for more coming up soon!
Walnuts.
Get your ‘walnuts’, just by using coriander seeds, that’s it!
Create a Miniature Desk Chair With Paper Quilling
Today, we have created something different than usual, what I mean is that I use other forms of materials than popsicle sticks, matches, or regular paper origami.
This is a miniature desk chair, on scale 1:12, made from quilling paper.
I have cut my own quilling paper for this, but if you want to make it easy on yourself, there is quilling paper available at online stores (see below the video for a link).
So, what do you need to create this chair? A list:
quilling strips (buy them or make them yourself), you need 60 strips in total of one particular color
black paper
a ruler
a crafting knife
crafting glue
skewer sticks
a cutter
scissors
I think that’s it! Just follow the instructions in the video, but if you have any more questions, feel free to ask the below in the comment section 😉 If you like this video, please hit the “like” button and subscribe to my channel, thank you!
Make A Pie From A Beer Cap.
Make A Pouf From A Plastic Bottle Cap.
Make A Fireplace Mantel From An Old Picture Frame.
How to Create Miniature Fruit Bowls by using plastic bottles?
Cut off the bottom from a plastic bottle and paint it with nail polish. You then get this modern look.
How To Make A Miniature Chair And A Miniature Hammock
And I have created a new video of this DIY-made miniature chair and miniature hammock, in one go.
These are totally made from everyday items and waste and are quite easy to do. Please just follow the instructions in the video 😉
I will keep adding pictures in the future of ‘upcycled’ trash to treasure projects. Remember also part 1 of this blog post in the FREEBIE section in the top menu of this website, so you don’t always need to buy expensive miniatures for everything around your dollhouse!
Do you have any questions about this blog post or would you like to add a project, then feel free to comment in the comment section below or join me on my Facebook group!
18 thoughts on “From Trash To Miniature Treasure Projects – Make Miniatures From Scratch – Part 2”
Hello there,
I happened upon your website looking for ‘different’ ideas, or an update to the old. I have been a miniaturist for over 50 years, and its always something new and exciting to learn. I being older, and growing up where diversity wasn’t as common, along with the lack of the INTERNET…imagination was key. Its so nice to see the young ones taking an interest in this very old hobby. Koodos to you darling!
Thank you so much for your wonderful comment and 50 years of working on miniatures, that is just fantastic! Thanks, dear!
Lizzy
PS If you have Facebook, then you are always welcome to share your miniatures on my Facebook group, I would love to see them!
I love your projects. I started in 2020 making doll houses. I want to make everything in it, I wish I could send pictures. You have very good projects for me to incorporate in my houses, especially the wooden Utensils. Thank you
I love all your tips and projects. I’ve made a few like the grapes before I had seen yours. People thought I was nuts using the silica, saying they would make me sick. Like I was going to eat them lol. Keep up the great work. Thank you for sharing.
Haha, yes people do tend to get worried over nothing 🙂 . I am glad to have given you lots of ideas and there will be more to come.
I am publishing an origami miniature shoes project today on my Youtube channel 😉
You are so talented. Thank you for sharing your beautiful work and ideas with us. I really appreciate it. I do miniatures just for relaxation. I don’t have a lot of money so this is just fantastic. Thank you again
It would’ve been nice to see you working on the pieces as you were cutting the straw using a black background. The light color and the clear straws basically we’re almost undetectable to me. Thank you, but it was a nice tutorial.
Hi Lizzy
I’ve totally enjoyed viewing each of your mini projects especially the grape tutorial which brought back mini memories, since I did a very similar tutorial which I published on my blog Studio E miniatures, back in 2013.
I find it always interesting how each individual can interpret an idea in a slightly different way, which makes their product different and unique to themselves and their personal style so Well Done!
I also want to commend you on the mini dryer construction- using the clear eyeshadow packaging for your appliance window – an absolutely Perfect Solution!
Hi Lizzie! (nice to see someone with the same name)
For sure, I also base my work on other people’s work, most of the time haha! There might be things that I thought were original at first, but there is always someone who created almost the same thing:-)
Although, I am working further on my treehouse, and I think that working with pencil scrapes for a rooftop could be quite original because nobody can be this crazy as me to do it like this haha!
Oh, do you still have this blog? Sounds interesting!
thank you,
Lizzy
I love your instructions & blog/YouTube vids. I am an artist & 71 yrs old. I didn’t know I was an “artist" until 1995 when a gallery asked to display some of my wall art quilts. 3D has always been way easier for me ever since I made tiny table settings from soft wax from used birthday candles. If I live long enough I hope to display some of the minis I’m. working on for fairy houses & 1:12 townhouses. Thank you for sharing with all us unknown vi
Hello Terry!
Thank you very much for all the compliments and of course, you are an artist, I’m sure 😉 I wish you a lot of happy crafting with your fairy houses and townhouses! Kind regards,
Lizzy
Hello Linda
there is no speech in my videos, everyone needs to just watch my videos without speech or text, they are very obvious to follow the instrucions. I try to make my tutorials as simple and easy as possible, so there is no need for subtitles or speech.
thanks for watching!
Kind regards
Lizzy
hi I just found this site and I really love how you reclaim waste material to make all these amazing miniatures. I was wondering if you could help me, as I’m trying to make a miniature matcha bubble tea for my friend, and I’m having trouble thinking of how to form the plastic cup shape with a lid without using clay, since I only have a variety of plastic scraps.
Hi Kitty, thanks for the compliment!
So about your question, if I understand this well,you would like to deform a plastic piece? The only way I can think of this being done, is by using heat,because (hard) plastic doesn’t really bend.
It is hard for me to give you a method for this, as heating plastic can always be dangerous and I wouldn’t like to be responsible for any accidents.
But what you could do is :
Use the hHot Water Method:
This method is useful for thin plastics.
Materials: Boiling water and a container.
Process:
Submerge the plastic piece in hot water for a few minutes.
Remove it carefully with tongs, then bend it while it’s still warm and flexible.
Cool it under cold water to set the shape.
Be careful!
Without using clay, creating a form with plastic pieces, seems tough to me, but if you managed or if you mean soeething else and I misunderstood your question, let me know!
Happy crafting
Lizzy


Hello there,
I happened upon your website looking for ‘different’ ideas, or an update to the old. I have been a miniaturist for over 50 years, and its always something new and exciting to learn. I being older, and growing up where diversity wasn’t as common, along with the lack of the INTERNET…imagination was key. Its so nice to see the young ones taking an interest in this very old hobby. Koodos to you darling!
Hi Michelle!
Thank you so much for your wonderful comment and 50 years of working on miniatures, that is just fantastic! Thanks, dear!
Lizzy
PS If you have Facebook, then you are always welcome to share your miniatures on my Facebook group, I would love to see them!
I love your projects. I started in 2020 making doll houses. I want to make everything in it, I wish I could send pictures. You have very good projects for me to incorporate in my houses, especially the wooden Utensils. Thank you
Thank you so much Denise for your wonderful comment and I hope that all of your projects may succeed 🙂
I wish you happy crafting!
Lizzy
I love all your tips and projects. I’ve made a few like the grapes before I had seen yours. People thought I was nuts using the silica, saying they would make me sick. Like I was going to eat them lol. Keep up the great work. Thank you for sharing.
Haha, yes people do tend to get worried over nothing 🙂 . I am glad to have given you lots of ideas and there will be more to come.
I am publishing an origami miniature shoes project today on my Youtube channel 😉
Happy crafting!
Kind regards,
Lizzy
You are so talented. Thank you for sharing your beautiful work and ideas with us. I really appreciate it. I do miniatures just for relaxation. I don’t have a lot of money so this is just fantastic. Thank you again
thank you Sherry for the compliments!
I wish you happy crafting!
Lizzy
It would’ve been nice to see you working on the pieces as you were cutting the straw using a black background. The light color and the clear straws basically we’re almost undetectable to me. Thank you, but it was a nice tutorial.
Me: doing things for free
Them: You should do it like this or like that, but thanks anyway.
Sigh
Hi Lizzy
I’ve totally enjoyed viewing each of your mini projects especially the grape tutorial which brought back mini memories, since I did a very similar tutorial which I published on my blog Studio E miniatures, back in 2013.
I find it always interesting how each individual can interpret an idea in a slightly different way, which makes their product different and unique to themselves and their personal style so Well Done!
I also want to commend you on the mini dryer construction- using the clear eyeshadow packaging for your appliance window – an absolutely Perfect Solution!
Hi Lizzie! (nice to see someone with the same name)
For sure, I also base my work on other people’s work, most of the time haha! There might be things that I thought were original at first, but there is always someone who created almost the same thing:-)
Although, I am working further on my treehouse, and I think that working with pencil scrapes for a rooftop could be quite original because nobody can be this crazy as me to do it like this haha!
Oh, do you still have this blog? Sounds interesting!
thank you,
Lizzy
I love your instructions & blog/YouTube vids. I am an artist & 71 yrs old. I didn’t know I was an “artist" until 1995 when a gallery asked to display some of my wall art quilts. 3D has always been way easier for me ever since I made tiny table settings from soft wax from used birthday candles. If I live long enough I hope to display some of the minis I’m. working on for fairy houses & 1:12 townhouses. Thank you for sharing with all us unknown vi
Hello Terry!
Thank you very much for all the compliments and of course, you are an artist, I’m sure 😉 I wish you a lot of happy crafting with your fairy houses and townhouses! Kind regards,
Lizzy
Your videos don’t seem to have English subtitles. I am deaf- can the instructions be typed
Hello Linda
there is no speech in my videos, everyone needs to just watch my videos without speech or text, they are very obvious to follow the instrucions. I try to make my tutorials as simple and easy as possible, so there is no need for subtitles or speech.
thanks for watching!
Kind regards
Lizzy
hi I just found this site and I really love how you reclaim waste material to make all these amazing miniatures. I was wondering if you could help me, as I’m trying to make a miniature matcha bubble tea for my friend, and I’m having trouble thinking of how to form the plastic cup shape with a lid without using clay, since I only have a variety of plastic scraps.
Hi Kitty, thanks for the compliment!
So about your question, if I understand this well,you would like to deform a plastic piece? The only way I can think of this being done, is by using heat,because (hard) plastic doesn’t really bend.
It is hard for me to give you a method for this, as heating plastic can always be dangerous and I wouldn’t like to be responsible for any accidents.
But what you could do is :
Use the hHot Water Method:
This method is useful for thin plastics.
Materials: Boiling water and a container.
Process:
Submerge the plastic piece in hot water for a few minutes.
Remove it carefully with tongs, then bend it while it’s still warm and flexible.
Cool it under cold water to set the shape.
Be careful!
Without using clay, creating a form with plastic pieces, seems tough to me, but if you managed or if you mean soeething else and I misunderstood your question, let me know!
Happy crafting
Lizzy