
I’ve made so many pieces of dollhouse furniture from cardboard over the years, and honestly, it’s still one of my favorite ways to build. It’s cheap, eco-friendly, and you probably already have the materials lying around the house.
What I like most is that cardboard is super forgiving: you can cut, layer, bend, and paint it into just about anything. I’ve built chairs, little sofas, and even a few quirky pieces that wouldn’t exist in any store.
In this guide, I’ll walk you through the basics I always use when working with cardboard, plus a few tricks I’ve picked up after a lot of trial and error (and glue-covered fingers 😅).
Updated 28/08/25
Tools & Materials You’ll Need for Cardboard Mini Furniture
When I make cardboard furniture, I try to keep the supplies simple. Here’s what I actually use most of the time:
- Sturdy cardboard – from shipping boxes or food packaging (avoid thin cereal boxes, they bend too easily).
- Sharp craft knife or box cutter – scissors can crush the edges, so a knife is better for clean cuts.
- Cutting mat – saves your table and helps with straight lines.
- Ruler & pencil – a metal ruler works best for guiding cuts.
- Glue – I use Aleene’s Tacky Glue, but wood glue or PVA glue also works.
- Clips or clamps – to hold parts together while they dry.
Optional, but handy:
- Bone folder or old butter knife – to score folds for neat edges.
- Sandpaper (fine grit) – to smooth out raw edges before painting.
That’s it: nothing fancy needed, unless you would make something like my cardboard sofa in the video below, then some fabrics and foam come in handy 😉
Designing and Planning Your Cardboard Dollhouse Furniture
Before grabbing the glue, it’s worth spending a little time on planning. I know from experience (and a few crooked chairs 😅) that a bit of sketching and measuring first saves a lot of frustration later.
Here’s how I usually approach it:
- Get inspired – Look around online, in magazines, or even at real furniture. On my blog, I’ve shared styles like Shabby Chic or Victorian, and more. Personally, I think modern is easiest to pull off with cardboard.
- Measure your space – Take the room or wall in your dollhouse and write down the dimensions. That way, you don’t end up making a sofa that won’t fit through the “door.” You can use my handy scale converter tool to get it right.
- Rough sketches – A simple pencil sketch is enough. No need to be an artist here.
- Think practical – Do you want the furniture just for looks, or do you want your dolls to actually “use” it? That changes how sturdy you’ll need to make it.
- Reinforce smartly – Cardboard can bend, so plan where you’ll add extra strips or double layers to keep things from sagging.
- Do a test run – If you’re unsure, cut a mini prototype from scrap cardboard first. It’s way easier to adjust now than after you’ve gone all in.
You can measure furniture for your dollhouse with the help of my conversion tool!
Convert any measurement in a known scale into another known scale.
Convert in scaleto in scale
Exactly like I did for the miniature kitchen of my mini treehouse:
Step-by-Step Assembly: A few examples
Once you’ve got your cardboard, glue, and a bit of patience, the possibilities are endless. The trick is to start small and build up your skills. Here are some of my own tutorials you might like to try:
1 Queen Anne Wing Chair
A classic upholstered armchair with curved wings and realistic texture.
What you need is cardboard, fabrics, paper tissues, UHU glue, scissors, a needle and thread (use a color that matches the fabrics), some paper, and chopsticks. All measurements are seen during the video, and this is on a scale of 1:12.
2 A large pink dollhouse sofa
As seen in the featured image of this blog post, it is this, quite pink lol, large mini sofa.
Other things you need are: kitchen tissues, (UHU) glue (or a glue gun if you want a quick fix as I did for the video), scissors, clear tape, and flexible textiles. That’s all!
Click on the picture below to take you to the actual video tutorial:

3. Dollhouse chairs from cardboard.
You can also use this dollhouse chair DIY PDF Pattern by Gwynne Ross, made from cardboard.

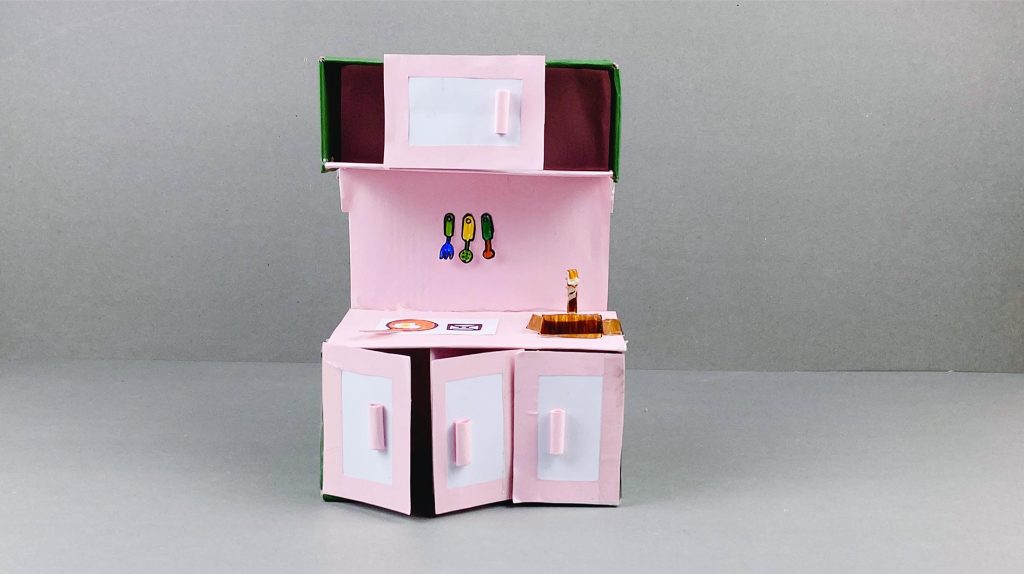
4. My dollhouse kitchen furniture, made from cardboard.
How about this crafting project: a dollhouse kitchen made from a box, so cardboard, and papercraft!
Again, please click on the picture below to take you to the actual tutorial!
My Final Conclusion
I hope that you enjoyed this blog post on how to make dollhouse furniture from cardboard, but if you have any more questions, please feel free to leave them below in the comment section.
You can also join (one of) my social media channels below or my cozy Facebook group, where you can also sell your miniatures!
I wish you happy crafting!
Kind regards,
Lizzy
related article:

Hi everyone!
My name is Lizzy, and I am an amateur miniaturist obsessed with everything in the dollhouse and miniature world, ever since I was a teenager.
So far, I have created 2 dollhouse projects, a backyard shed and a miniature treehouse, tons of DIY dollhouse kits, and “hacked” some.
I also created a fairy garden, and lots of small and simple miniature projects on my YouTube channel. (mostly made from trash or everyday items).
I love to write as well about all things happening in the miniature world, hence the reason why I created this blog!
I wish you happy reading and crafting!
Lizzy


Страхотно се е получил урока , любимият ми материал за изработка .Поздрави и целувки!
hello, I needed to translate this haha, but thanks!
Lizzy
Sweet ideas for using cardboard to make doll furniture, interiors, etc. I am really creative and do like to make stuff all the time. I like the idea of making these out of cardboard. I want to try a bed first. However, I think I will just paint it blue and white to match the Indianapolis Colts colors and then apply some decals and go over it with Modge Podge to seal it.
Hello Dude!
Thanks a lot for your comment and your idea to paint a bed into the Indianapolis Colts colors sounds like a terrific idea! And sealing it with Mod Podge is great as well!
All the best,
Lizzy
Hey,
This is such an informative and interesting article.
I am going to use some of the ideas here to work on with my niece, she will love working on this for her own dolls and toys. When she learns this with me she can then share these ideas with her friends and she will be the coolest one of the gang 🙂
I will share these with my friends too so they can work on these with their own kids.
Thank you for sharing and keep up the great work.
All the best,
Tom
Hello Tom!
Thank you for the compliments and I hope that your niece and other kids will have a great time!
All the best to you too,
Lizzy