Welcome to the delightful little world of miniature origami flowers! With just a few folds of paper, you can breathe life into beautiful, tiny blooms that captivate and charm.
In the next section, ‘Gathering Your Miniature Garden Supplies,’ I’m going to equip you with the tools and materials needed to start your origami garden, give some insights on how to create those tiny flowers, and of course show you examples (of my own creation as well)
So, let’s go straight ahead and prepare to plant the seeds of creativity together.
As an Amazon, Etsy and Anavrin associate, I earn a small commission from your purchase, with no extra charges for you.
Gathering Your Garden Supplies: What You Need for Miniature Origami Flowers
Miniature origami flowers might look difficult to create, but with the right materials, you’ll craft these tiny blooms in no time. Let’s talk about the essentials you need to start your miniature garden.
First off, choosing the right paper is crucial. You’ll want lightweight but stiff paper that can hold a crease well, like kami or washi.
I’m talking about paper that’s thin enough for delicate folds but won’t crumble under your fingers. Look for origami paper packs specifically designed for small crafts at your local art store or shop online for more variety.
Ensure your workspace is clean and flat. You’re working on a miniature scale, so even the smallest lint or bump can become a big issue. A tidy area allows for smoother folding and better focus.
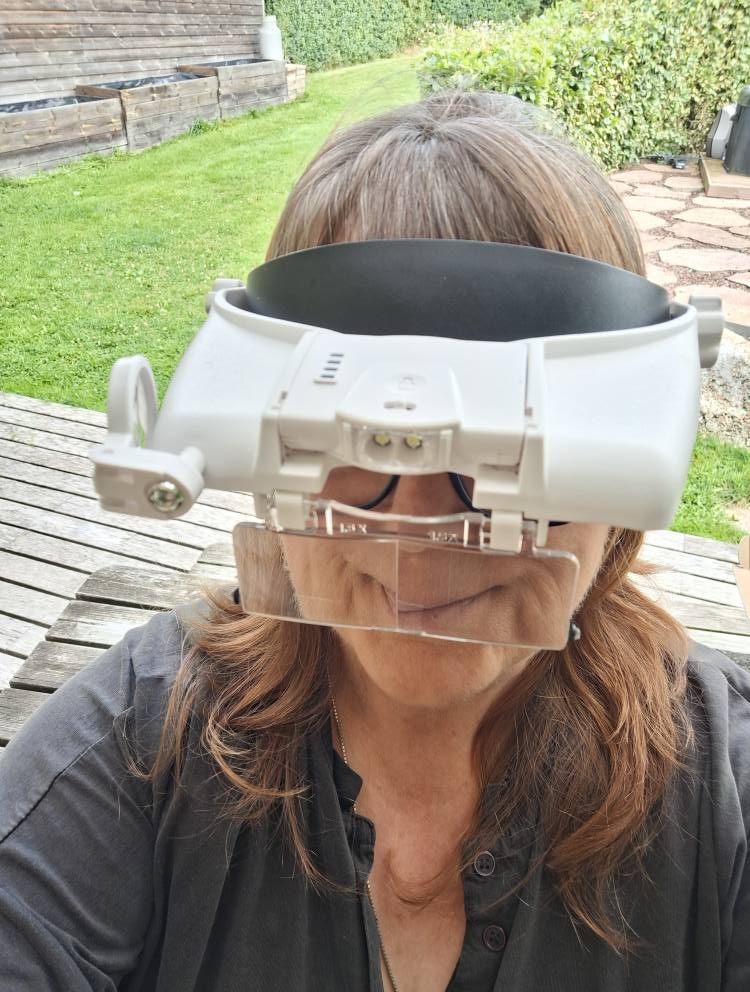
Now, a magnifier headband might sound like overkill, but if you’re struggling to see those tiny folds, it’s a game-changer. Let your eyes relax while you concentrate on creating your mini masterpieces.
My headband magnifier
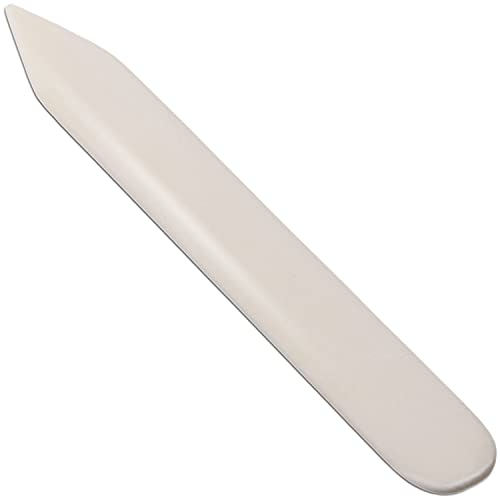
The finest scissors, to cut your paper to a millimeter, as sharp as possible, as this is in the mini world even more important than with regular origami. Each mm counts!
Let’s talk about the million-dollar question: what type of glue to use for miniature flowers?
For miniature origami flowers, you’ll want a precise glue, that dries clear and doesn’t soak into the paper too much, as it could affect the delicate folds and overall appearance of the flower. Here are a few options:
– Craft glue or white glue: These types of glue are often readily available and dry clear. You’ll want to use them sparingly. You could apply a small amount with a fine-tipped applicator, toothpick, or brush for precise application. My favorite type of white crafting glue is called Grab Fast Tacky glue, especially the one standing on its head, so it is instantly available.
– Origami-specific glue: Some brands offer glues specifically designed for origami and other paper crafts. These glues are often formulated to provide a strong bond without damaging the paper. Like the brand called Tombow.
With your materials gathered, you’re all set to jump into the heart of origami— and create your very first origami flower.
The Art of Origami: Step-by-Step Miniature Origami Flower Creations
I’m going to walk you through a step-by-step process to create your very first tiny paper blooms.
Start simple. I recommend a less complex design, such as a mini tulip or rose, which will let you get the hang of the basic folds without too much frustration.
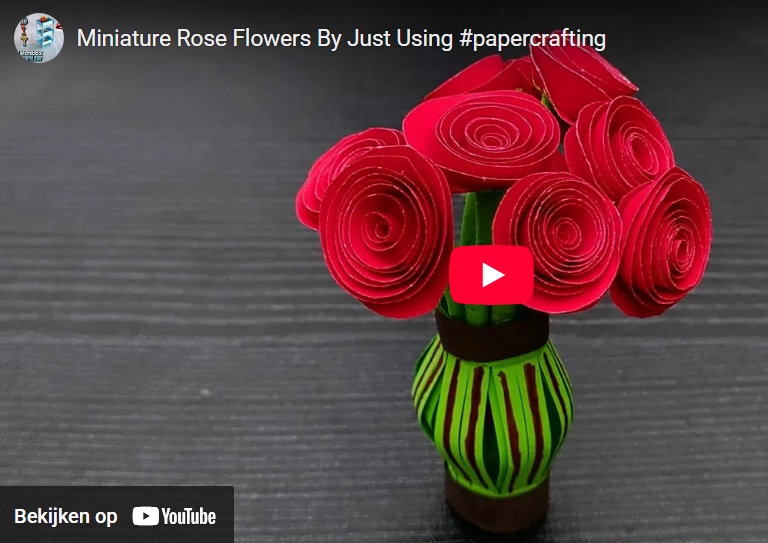
In one of my first video tutorials on how to create miniature papercraft flowers, I assembled these tiny roses.
Watch how I create flower stems by folding and cutting green paper, then I draw a circle with a compass, and finally fold the mini roses and glue them all together.
An easy, but pretty first project, no? Click on the picture below to take you to the tutorial!
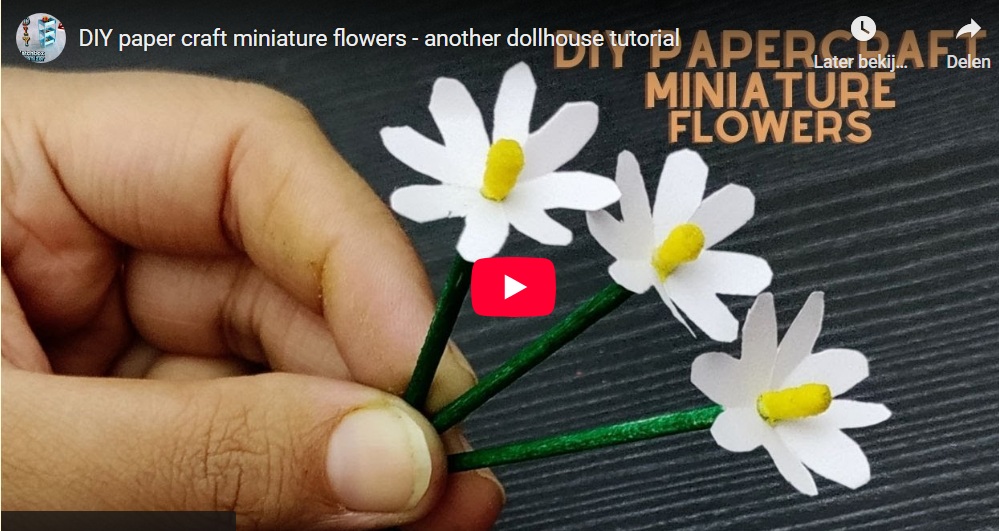
2. How to create origami miniature daisies?
In my next tutorial, which gets a bit more complicated, I have crafted these cute little mini daisies!
This time, I added toothpicks to the game for the stems and a green pen, and yellow and white acrylic paint.
Then you just need to fold and cut white paper and glue everything together again, that’s it!
3. How to create miniature origami orchids
Yeah, so these are a bit larger, but of course, you can always adjust the scale to your liking: origami orchids!
Here again, I am using green paper for the stems (and leaves), and cutting out the flower petals and stamens and folding them as seen in the video.
As a bonus, there is a second tutorial hiding behind the first one, and you have 2 different projects!
4. How to create a bouquet of origami miniature spring flowers?
Spring crafting is in the air, so it’s time for a mini spring bouquet of different colored flowers.
Yet again, we are using the same method to create the stems with green paper, cut out the leaves from green paper as well.
And then, pick as many colors as you like and fold the flowers!
5. How to create origami miniature hyacinths- a different method than before!
Now for this one, we are using a totally different method than before to create these mini hyacinths!
First, you need to cut out long strips of paper and glue all of the strips together at the ends to form a very long strip, followed by splitting a toothpick.
Fold the long strip all around the toothpick, you now have a little “hat” of paper, and thus created a plant pot!
Create a smaller “hat” after the first large one and place this inside the pot. (you’ll see what I mean with all of this in the video)
You can now create heaps of little flowers in different colors, as much as you like.
To make the stems, this time I am using a metal wire and I wrap it in green floral tape.
Follow the instructions further to create the leaves of this plant.
Glue the flowers and leaves on the stems. Glue everything together in the paper plant pot, and done!
You can always adjust your approach down the road as you get more comfortable with these techniques.
Now that you’ve got the hang of creating miniature origami flowers, let’s talk about breathing life into them. I’m going to help you find creative ways to showcase your paper garden.
1. Create a miniature bouquet in a vase.
Maybe you can arrange your mini flowers in a bouquet and place them in a tiny vase?
2. Create a miniature greenhouse or buy one and start to fill it up with flowers!
Have you seen my DIY greenhouse miniature kit called Cathy’s Flower House? It was my first DIY house kit from Robotime (aka Rolife), and it wasn’t easy!
But it was a journey for sure that lifted my skills in mini flower and plant making with the help of dollhouse printables. The difference here is that these were on a scale of 1:24 though, so keep that in mind!
How about you create a roombox diorama that includes a lot of flowers, like a miniature florist shop or an old wall of a building covered in vines with flowers?
Let your fantasy run wild, anything is possible and there is no limit!
I really hope that you’ve enjoyed this journey into the delicate world of miniature origami flowers. Feel free to share your blossoming creations and any tips you’ve picked up along the way. I’d love to hear your feedback, so leave your comments below!
You can also join (one of) my social media channels below, especially my YouTube channel, for more tutorials on anything miniature-related, see you there?
Making miniature origami flowers is definitely something that my artistic friends and family members would be most interested in. Thank you for providing all the details and steps to take. Much appreciated.
Alright Lizzy, I’m about to critique your article “How To Create Miniature Origami Flowers? -Plenty Tutorials!" First off, amazing, I love it, and I bookmarked this page, my daughter is OMG, crazy about this Origami stuff. Other than that, again great article, I know, this is something I do find interest in, as I’m a gardener, I think and I love plants, so this origami flowers thing is something I really can get with. My only reservation is, acquiring all the equipment. I know I can but, it depends on my desire to pursue it. Your page is really well put together I think, with all the YouTube videos, which are the tutorials to different flower projects. Like I said, I bookmarked this page, because when I come cross the time and have prepared myself, meaning I’ve acquired the materials. I’m giving this a go, I love orchids, roses, and I’m kind of fond of tulips, but, all of your different ideas or I guess suggestions on my choices are very exhilarating. I’m glad I chose to click on your articles, because each one is of very much interest to me, and were very informational. I don’t know if my comment will help you any or be of any use, but I am glad I came cross them. As said in one of my other comments on one of your articles, you shed light on possible interests of mine, that I just have never dived into.
Hello Thomas
Thank you for the enthusiasm and compliments, but I am not sure at all for what you mean by ‘unused space’? I don’t see that myself to be honest?
I hope you will enjoy your origami projects, do give a shout when you have any questions!
Lizzy
Lizzy, your tutorial on creating miniature origami flowers is absolutely enchanting! I’ve always been fascinated by the delicate art of origami, but the idea of bringing it into the miniature world adds an entirely new layer of charm and challenge. Your step-by-step guide, especially the tips on creating roses, daisies, and orchids, makes it seem so approachable. The method you described for the miniature hyacinths sounds so unique and the result looks stunning. Thank you for sharing your knowledge and creativity with us. Your passion for miniatures shines through every word. Can’t wait to see what other miniature wonders you’ll guide us through next!
Hello Lizzy,
I am amazed, absolutely delightfully amazed. I stumbled across your page by accident when researching origami. I had absolutely no idea about making the beautiful precise tiny origami flowers you create. They are all beautiful but my favourites are the origami orchids. I don’t honestly think I would have the patience to do it myself. However, I do have friends who love their arts and crafts and they would totally fall in love with this site. I must congratulate you on the idea of origami flowers, genius, I applaud your creativity.
Hello Catherine!
Thank you so much for your wonderful comment and thanks for having your friends take a look at my site 😉 I wish them happy crafting!
Lizzy
Bonjour, vos créations sont très rafraîchissantes, harmonieuses et biens exécutées…J’ai cliqué sur cette page car je suis une inconditionnelle de l’Origami ! Mais voilà votre proposition n’est pas à inscrire dans celui de l’Origami puisque cet Art ne supporte ni colle ni ciseaux…Il axe sa réalisation sur le pliage, le contre pliage et l’emboitement…Voilà…😉
Signé :
Madame l’enquiquineuse😊!


Hi Lizzy,
Wow, these origami flowers look so real.
I am going to start working on these myself so I can give them to my girlfriend when needed 🙂
I will also work on these for family members when I go back to Liverpool to visit them.
Thank you for sharing yet another great tutorial.
Keep up the amazing work.
All the best,
Tom
Thank you Tom, have fun with the family!
Lizzy
Making miniature origami flowers is definitely something that my artistic friends and family members would be most interested in. Thank you for providing all the details and steps to take. Much appreciated.
Alright Lizzy, I’m about to critique your article “How To Create Miniature Origami Flowers? -Plenty Tutorials!" First off, amazing, I love it, and I bookmarked this page, my daughter is OMG, crazy about this Origami stuff. Other than that, again great article, I know, this is something I do find interest in, as I’m a gardener, I think and I love plants, so this origami flowers thing is something I really can get with. My only reservation is, acquiring all the equipment. I know I can but, it depends on my desire to pursue it. Your page is really well put together I think, with all the YouTube videos, which are the tutorials to different flower projects. Like I said, I bookmarked this page, because when I come cross the time and have prepared myself, meaning I’ve acquired the materials. I’m giving this a go, I love orchids, roses, and I’m kind of fond of tulips, but, all of your different ideas or I guess suggestions on my choices are very exhilarating. I’m glad I chose to click on your articles, because each one is of very much interest to me, and were very informational. I don’t know if my comment will help you any or be of any use, but I am glad I came cross them. As said in one of my other comments on one of your articles, you shed light on possible interests of mine, that I just have never dived into.
Hello Thomas
Thank you for the enthusiasm and compliments, but I am not sure at all for what you mean by ‘unused space’? I don’t see that myself to be honest?
I hope you will enjoy your origami projects, do give a shout when you have any questions!
Lizzy
Lizzy, your tutorial on creating miniature origami flowers is absolutely enchanting! I’ve always been fascinated by the delicate art of origami, but the idea of bringing it into the miniature world adds an entirely new layer of charm and challenge. Your step-by-step guide, especially the tips on creating roses, daisies, and orchids, makes it seem so approachable. The method you described for the miniature hyacinths sounds so unique and the result looks stunning. Thank you for sharing your knowledge and creativity with us. Your passion for miniatures shines through every word. Can’t wait to see what other miniature wonders you’ll guide us through next!
thank you Angie for all the compliments!
Lizzy
Hello Lizzy,
I am amazed, absolutely delightfully amazed. I stumbled across your page by accident when researching origami. I had absolutely no idea about making the beautiful precise tiny origami flowers you create. They are all beautiful but my favourites are the origami orchids. I don’t honestly think I would have the patience to do it myself. However, I do have friends who love their arts and crafts and they would totally fall in love with this site. I must congratulate you on the idea of origami flowers, genius, I applaud your creativity.
Hello Catherine!
Thank you so much for your wonderful comment and thanks for having your friends take a look at my site 😉 I wish them happy crafting!
Lizzy
They will love this site.
Bonjour, vos créations sont très rafraîchissantes, harmonieuses et biens exécutées…J’ai cliqué sur cette page car je suis une inconditionnelle de l’Origami ! Mais voilà votre proposition n’est pas à inscrire dans celui de l’Origami puisque cet Art ne supporte ni colle ni ciseaux…Il axe sa réalisation sur le pliage, le contre pliage et l’emboitement…Voilà…😉
Signé :
Madame l’enquiquineuse😊!
Great, thanks for the correction Madame! 🙂
Kind regards,
Lizzy