You might wonder: why is Lizzy writing in her title: “part 2105”? Well, I have written so many blog posts about creating mini projects with everyday materials and some upcycling, that I was too lazy to look up how many I have written already haha! Forgive me.
Also, remember that I do have a YouTube channel as well, with tons of projects already, but lots of people prefer miniature tutorials with step-by-step pictures, so yeah, let’s go again here! 🙂
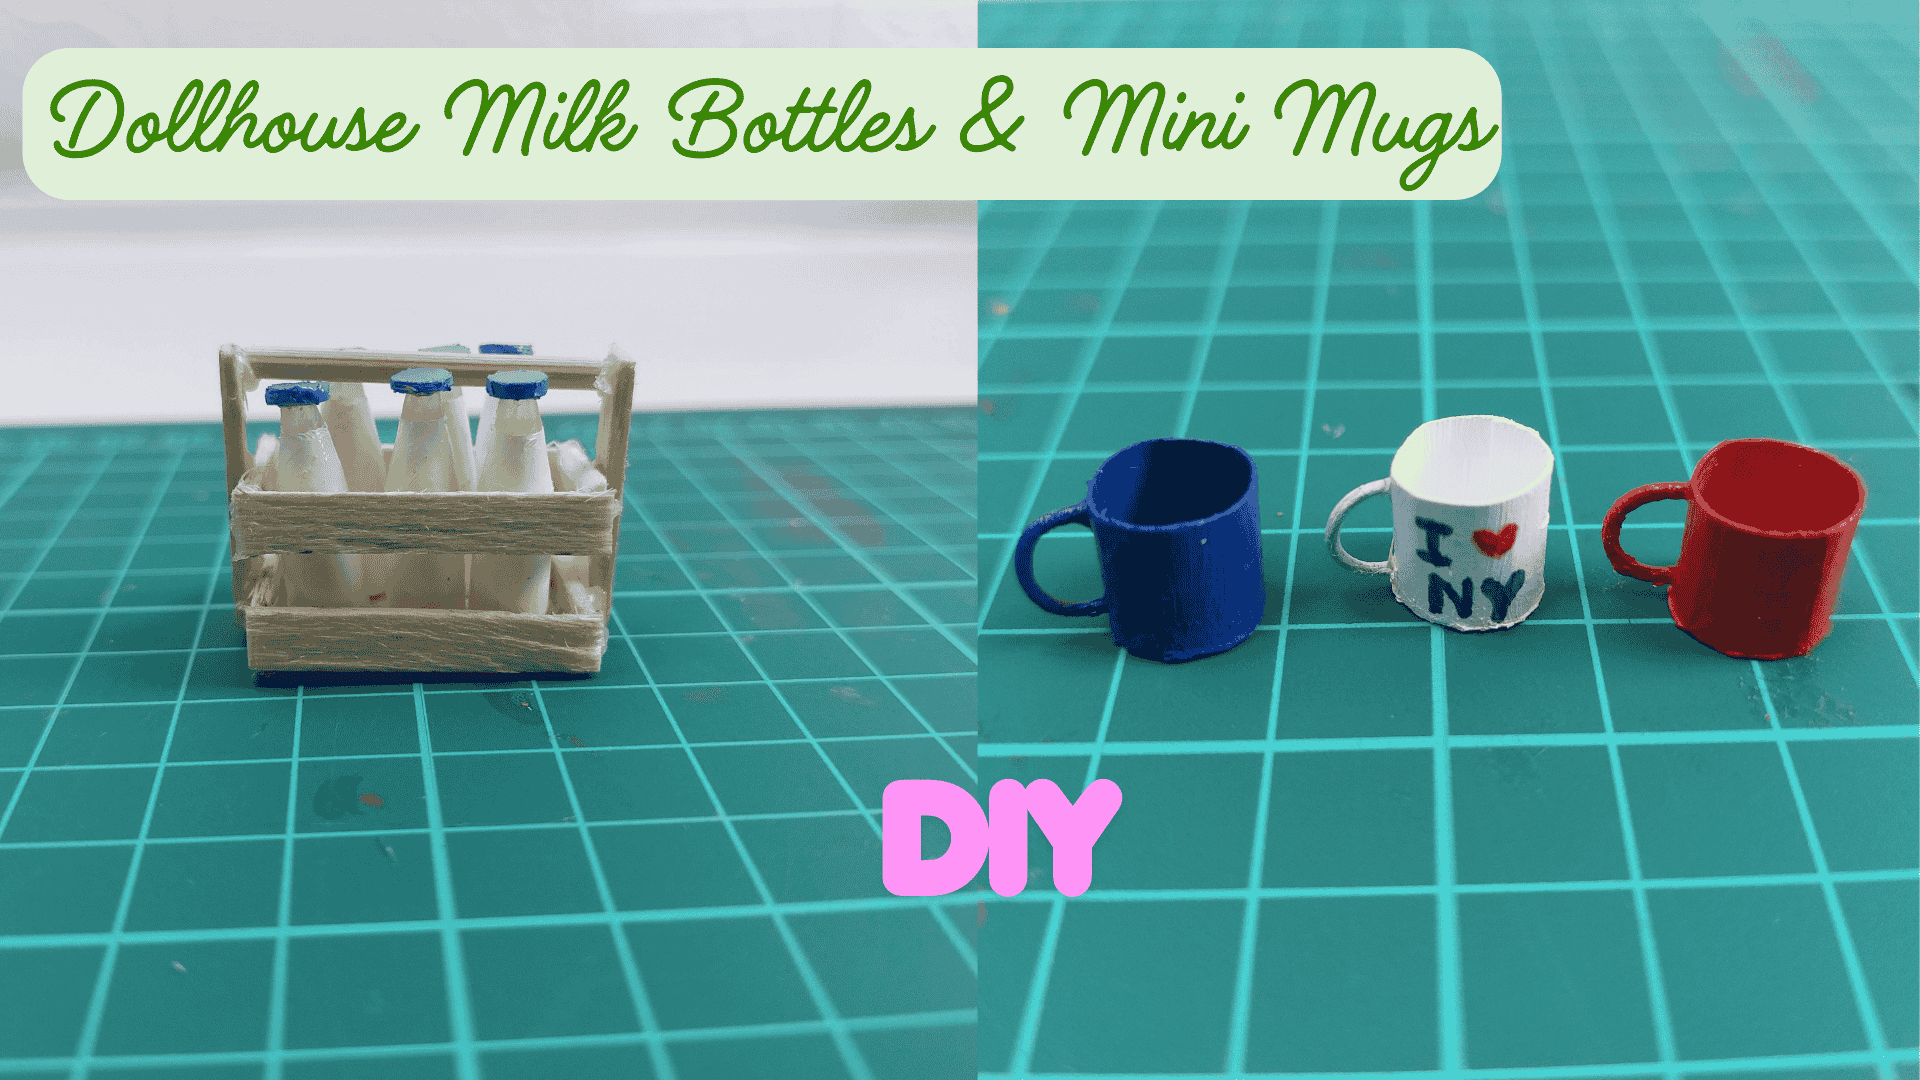
How to Make DIY Miniature Mugs from Paper or Card Stock
If you’re looking for a quick and affordable way to make tiny mugs for your dollhouse or miniature collection, this little project is a fun one to try.
You only need some paper or card stock, a paper clip, and a bit of paint. The result? Cute, realistic miniature mugs that can be customized in any color or design you want.

Materials Needed for DIY Miniature Mugs
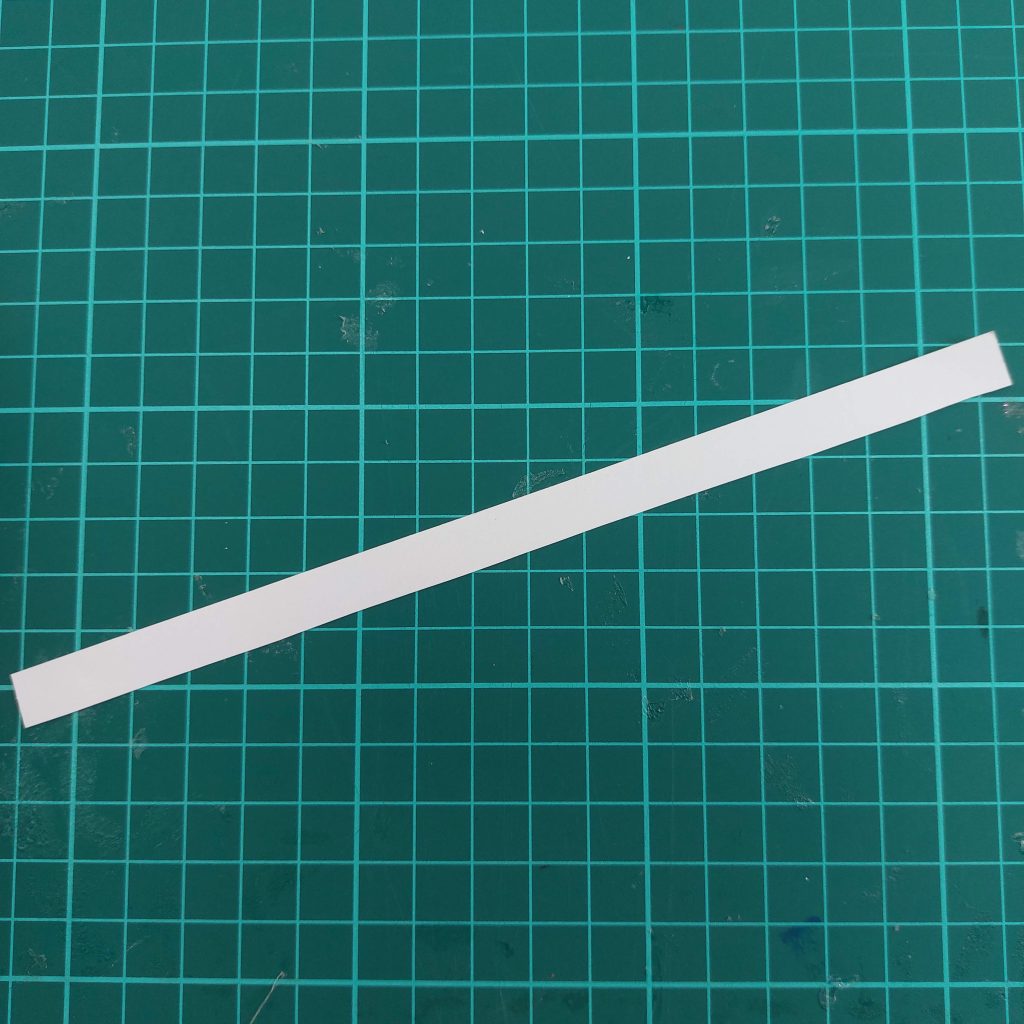
- Paper or cardstock (cut into 1 cm wide strips)
- Scissors
- B-6000 glue (or another strong adhesive)
- Paper clip (for the mug handles)
- Cutter or craft knife
- Acrylic paint (any colors you like)
Tip: Cardstock will give your mugs a sturdier feel, while regular paper will work if you want them thinner and lighter.
Step-by-step tutorial:
- Step 1: Prepare the Paper Strip
Cut a strip of paper or cardstock about 1 cm wide. This will form the base of your mug.
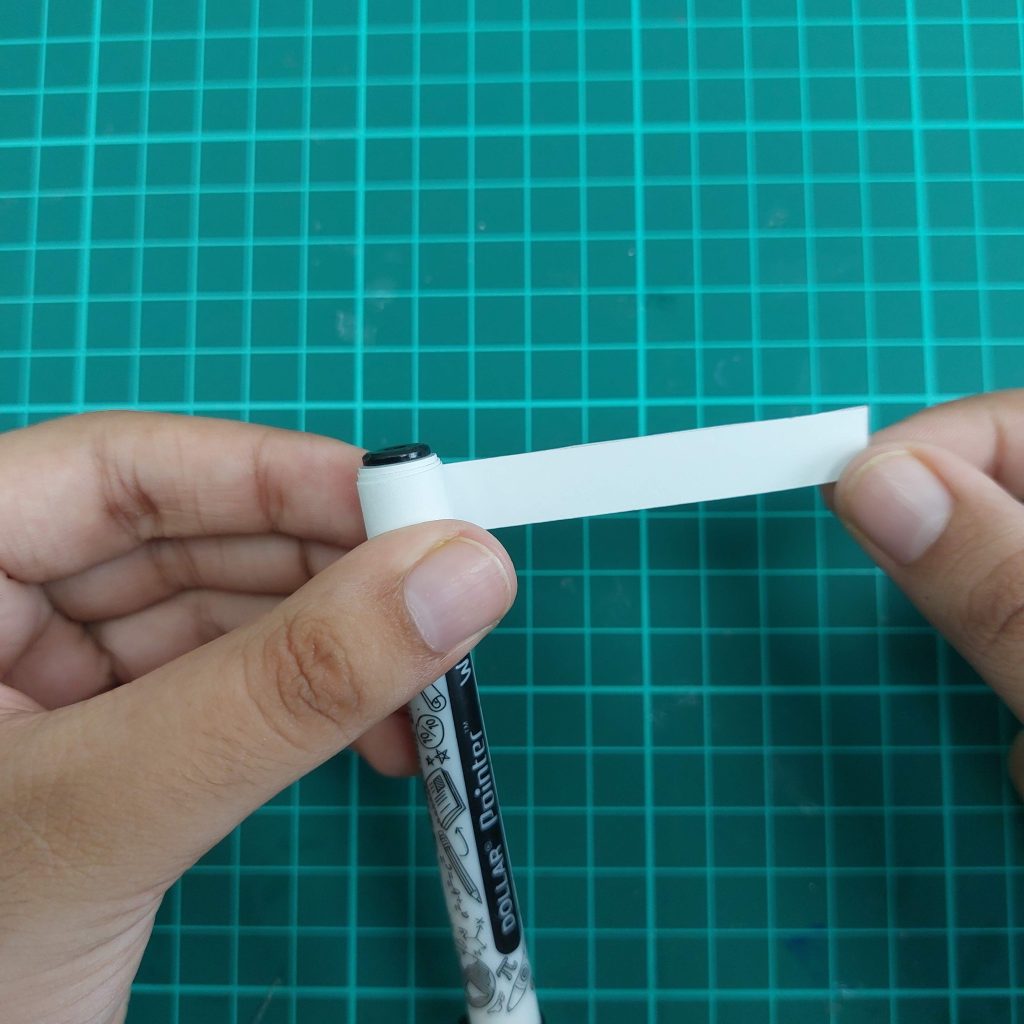
- Step 2: Roll the Paper
Wrap the strip tightly around a pen or marker to create a cylinder shape.
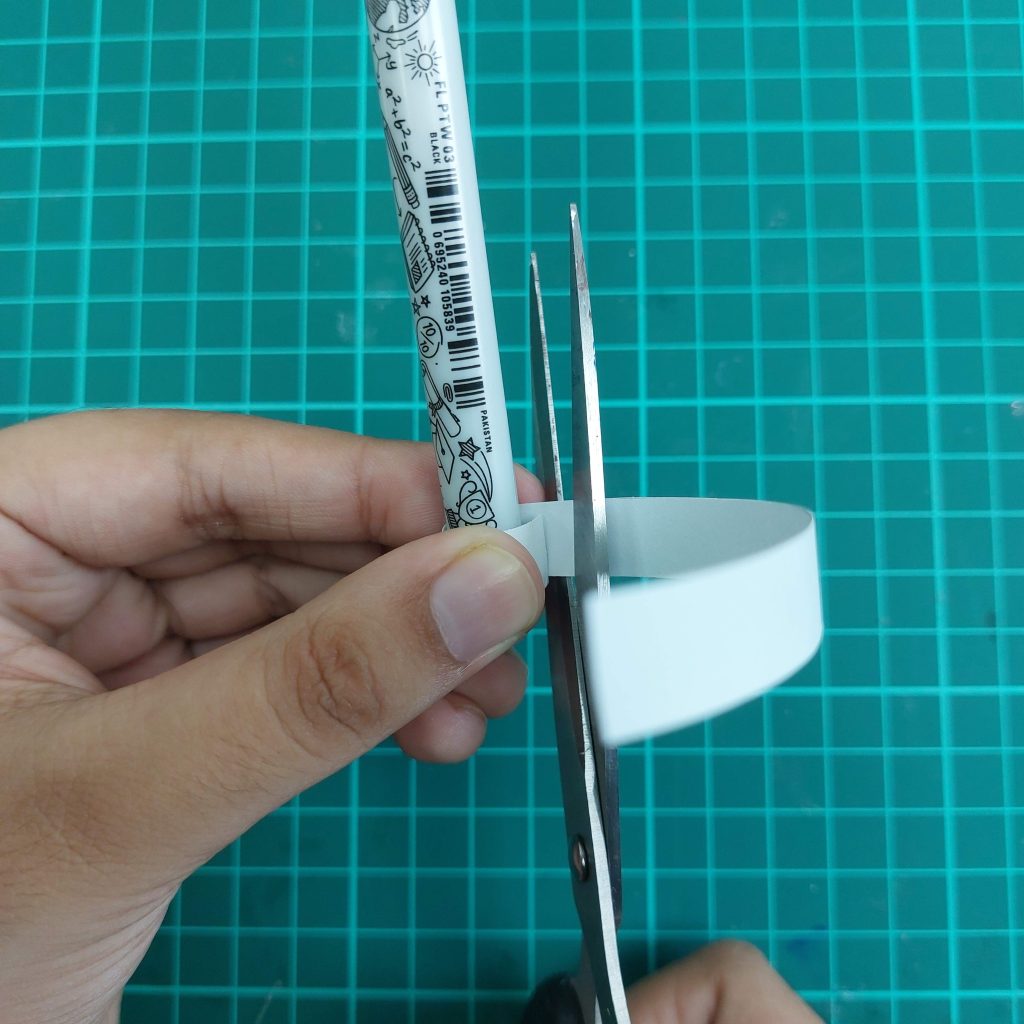
- Step 3: Cut to Size
Trim off the extra paper once you’ve reached the mug size you want.
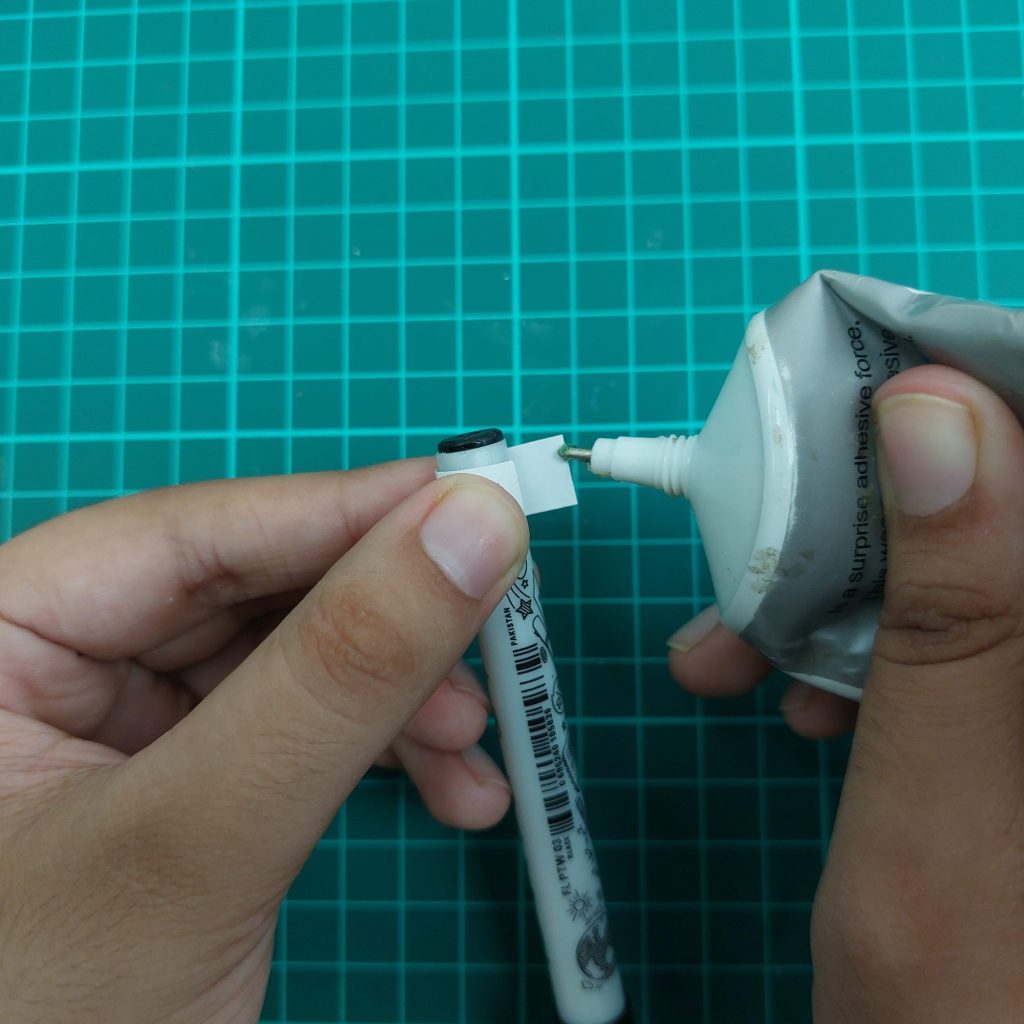
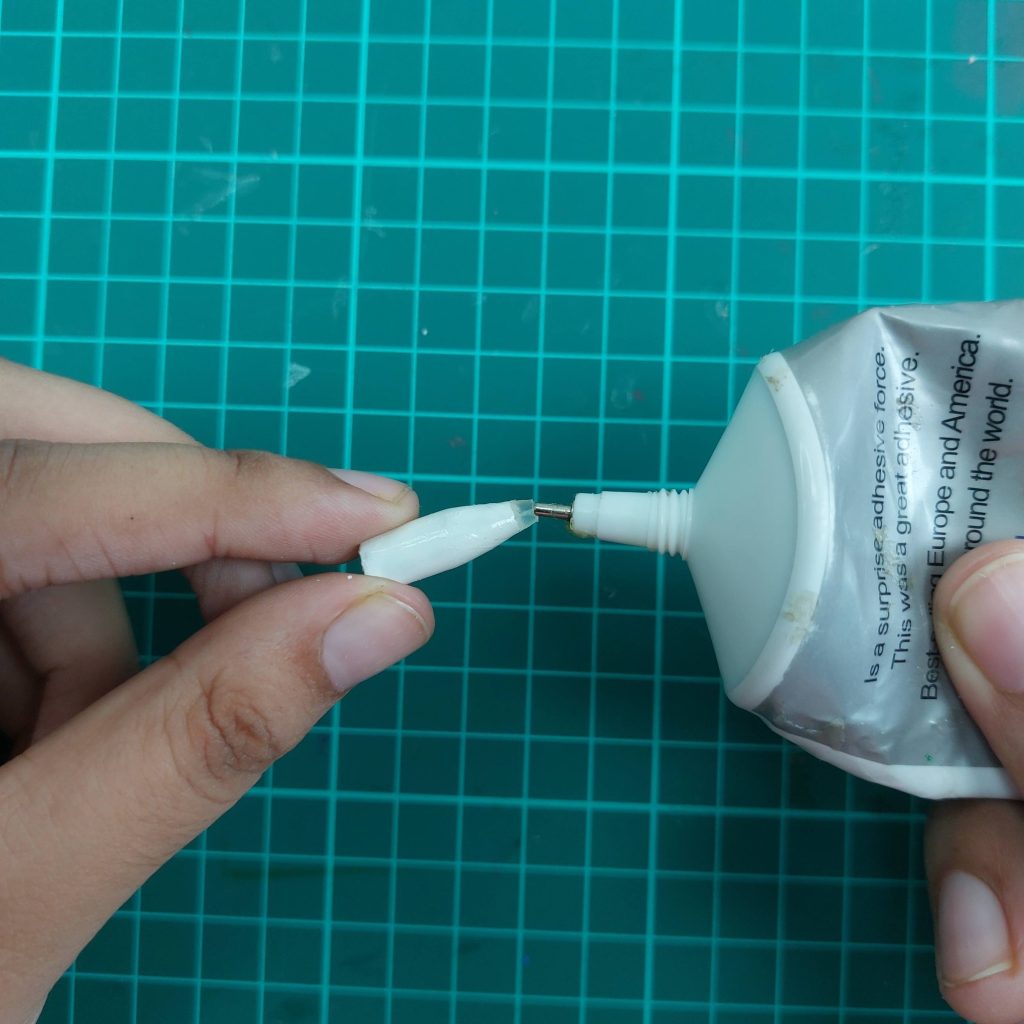
- Step 4: Glue the End
Add a small dot of B-6000 glue to the edge and secure the paper so it doesn’t unravel.
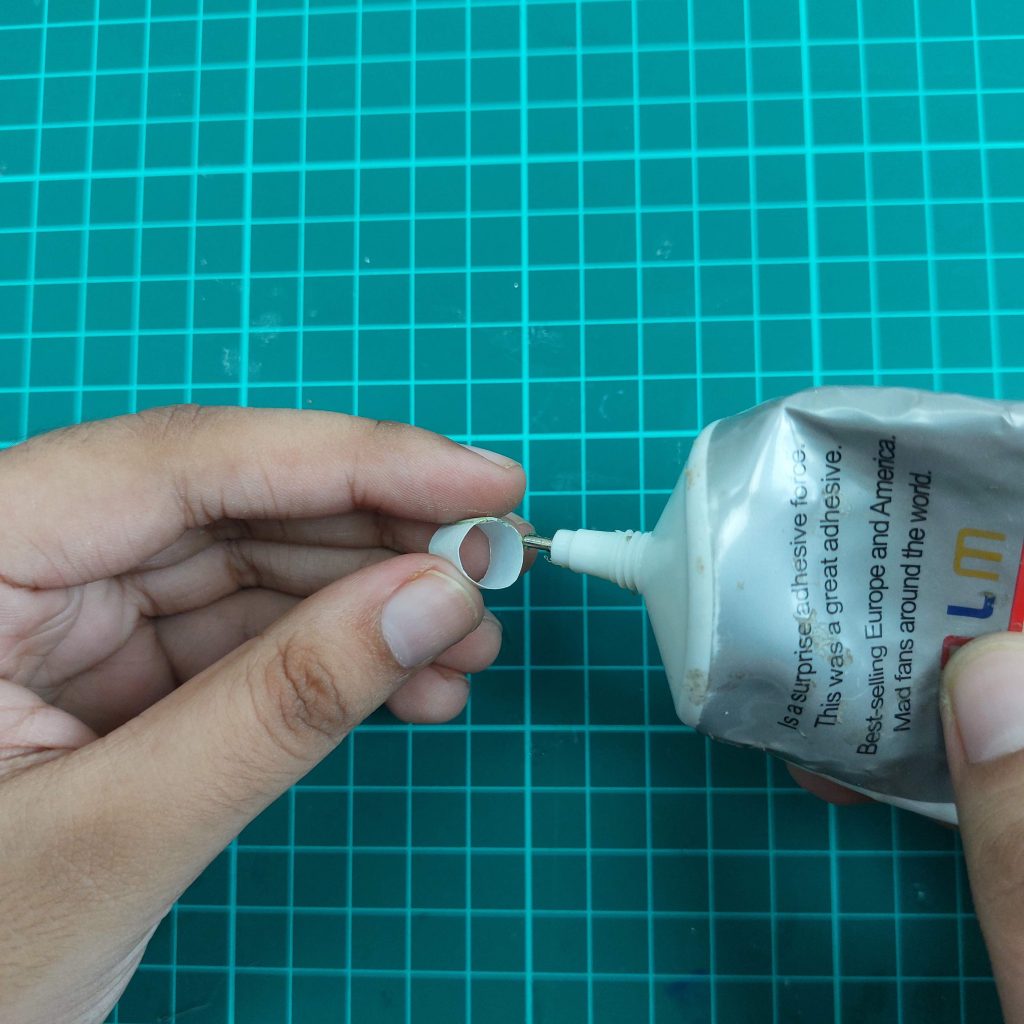
- Step 5: Seal the Bottom
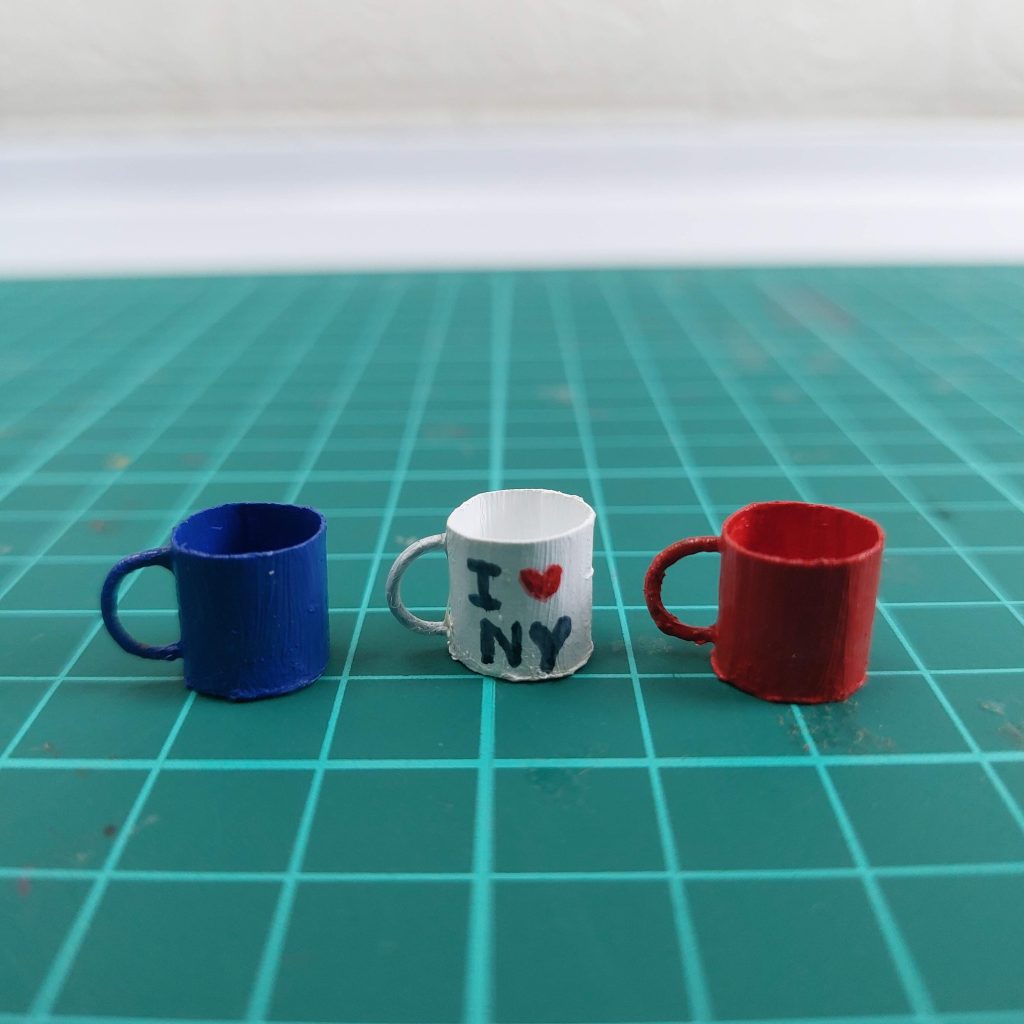
Apply glue around one side of the cylinder and press it onto another piece of paper or cardstock. This will create the mug’s bottom. Let it dry before trimming the excess. I’ve made three of them.

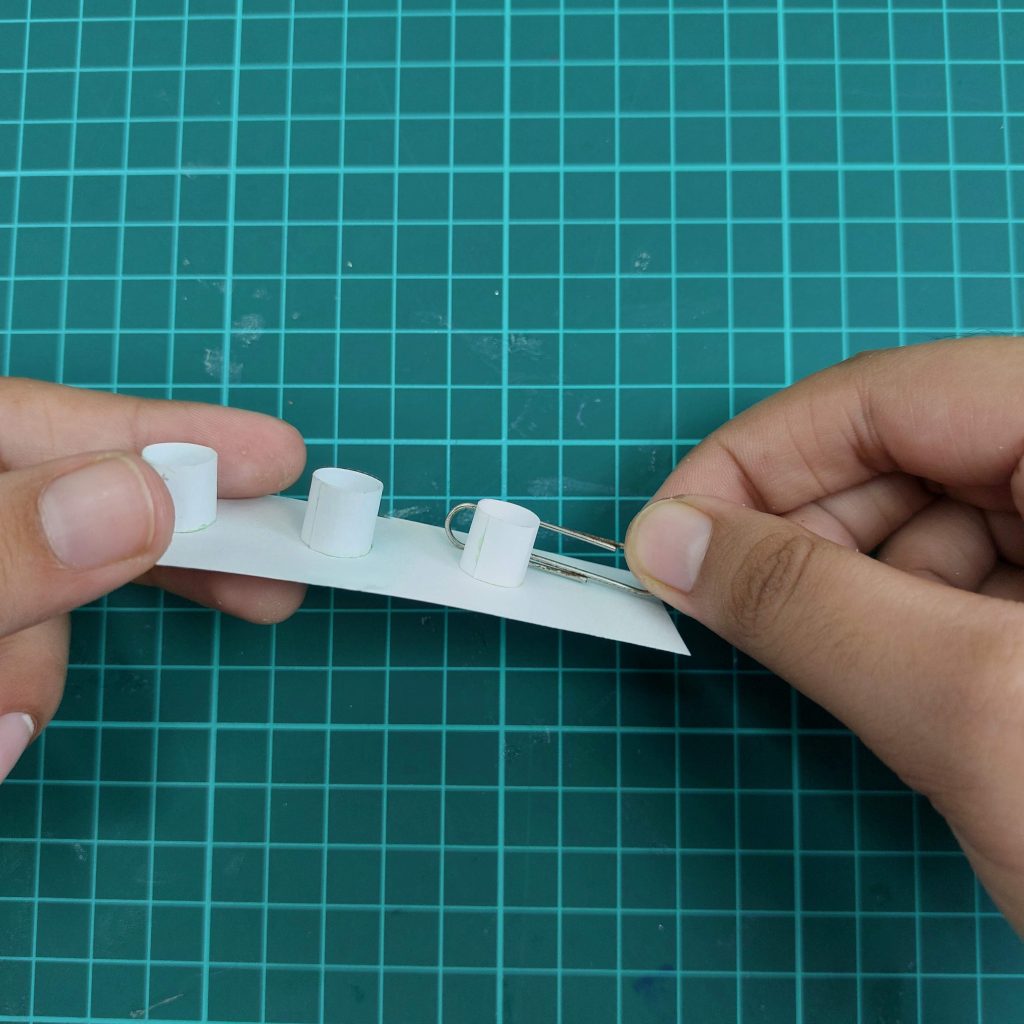
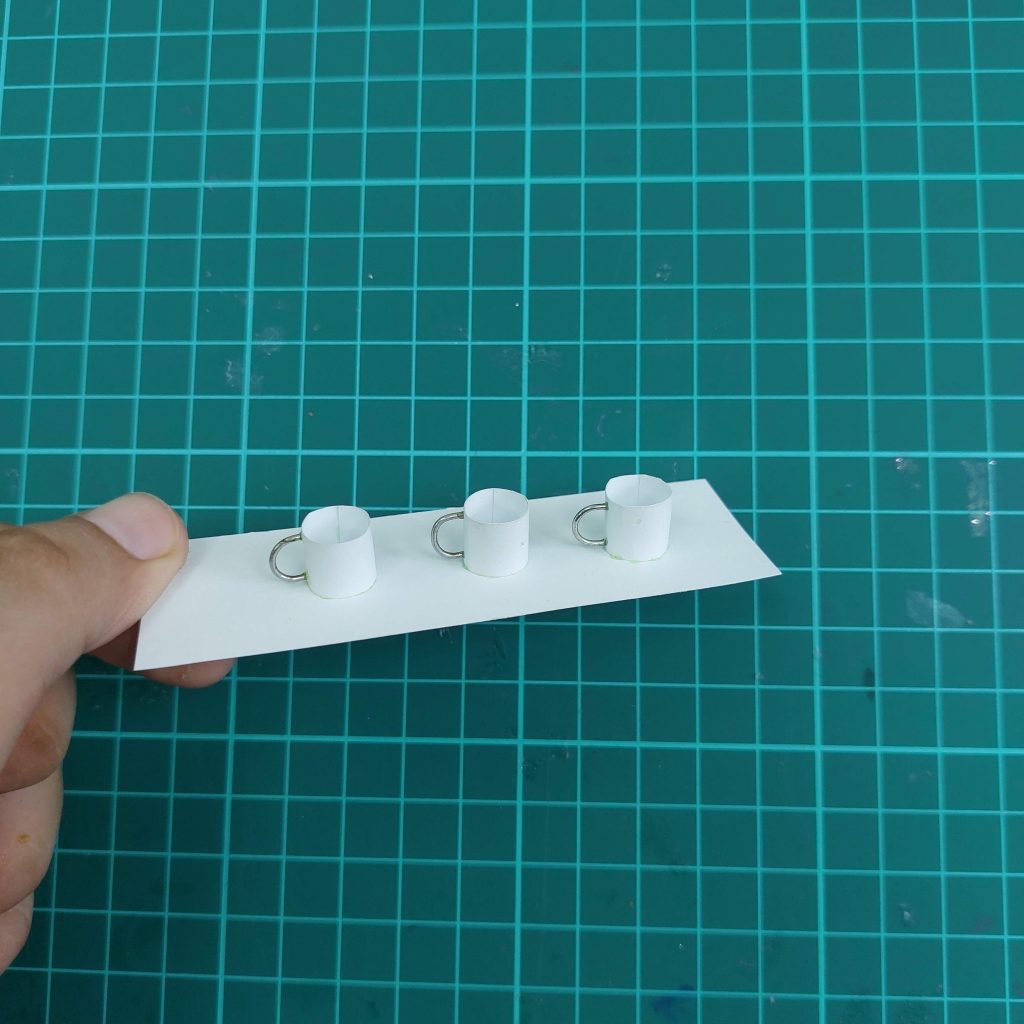
- Step 6: Add Handles
Cut small pieces from a paper clip and shape them into tiny handles. Attach each one to the mug with a little glue.
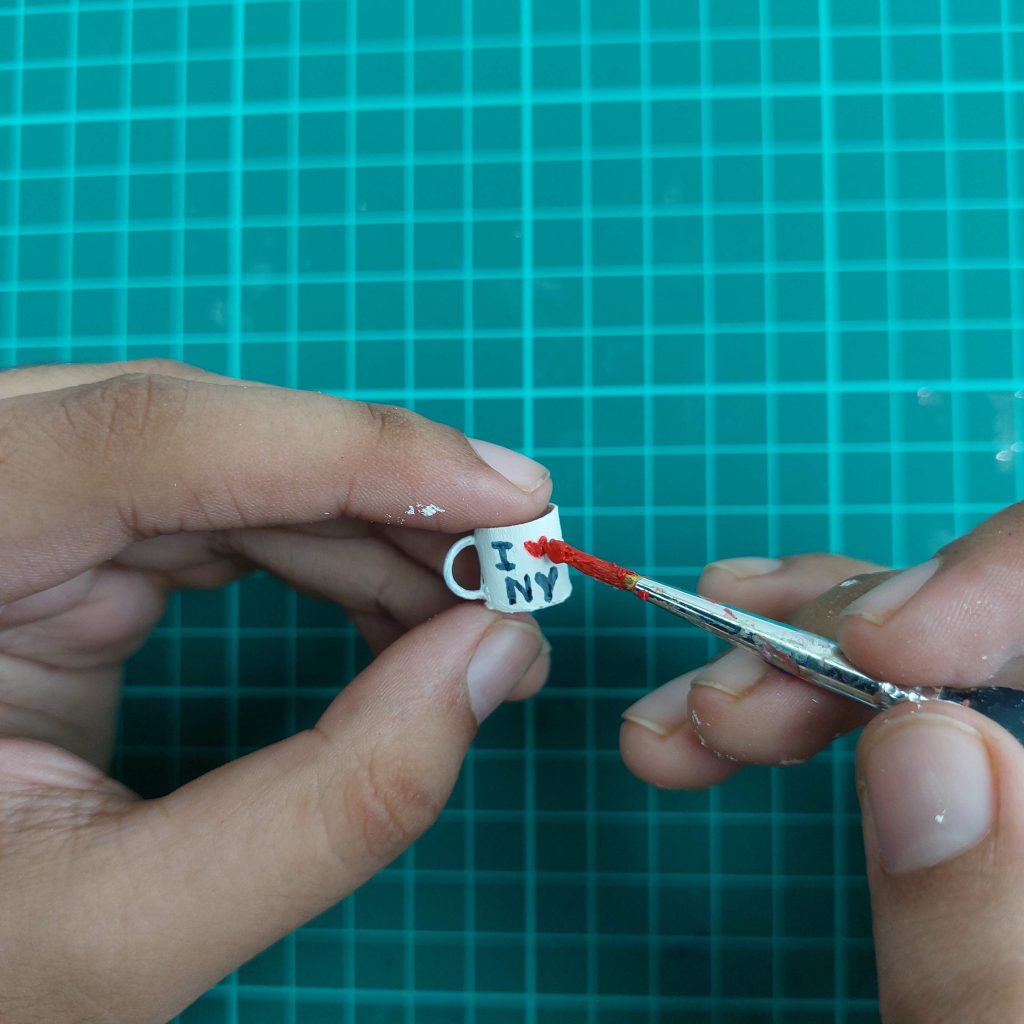
- Step 7: Paint the Mugs
Once the glue has dried, paint the mugs with acrylics. You can go for solid colors, or add fun designs like stripes, dots, or even little logos. Don’t forget to paint the bottom in the same color as your mug.
After drying, you can now cut out the mug completely.


- Step 8: Finishing Touches
How about personalising your mug? And, finished! I hope you enjoyed this tutorial!
How to Make Miniature Milk Bottles from Everyday Materials
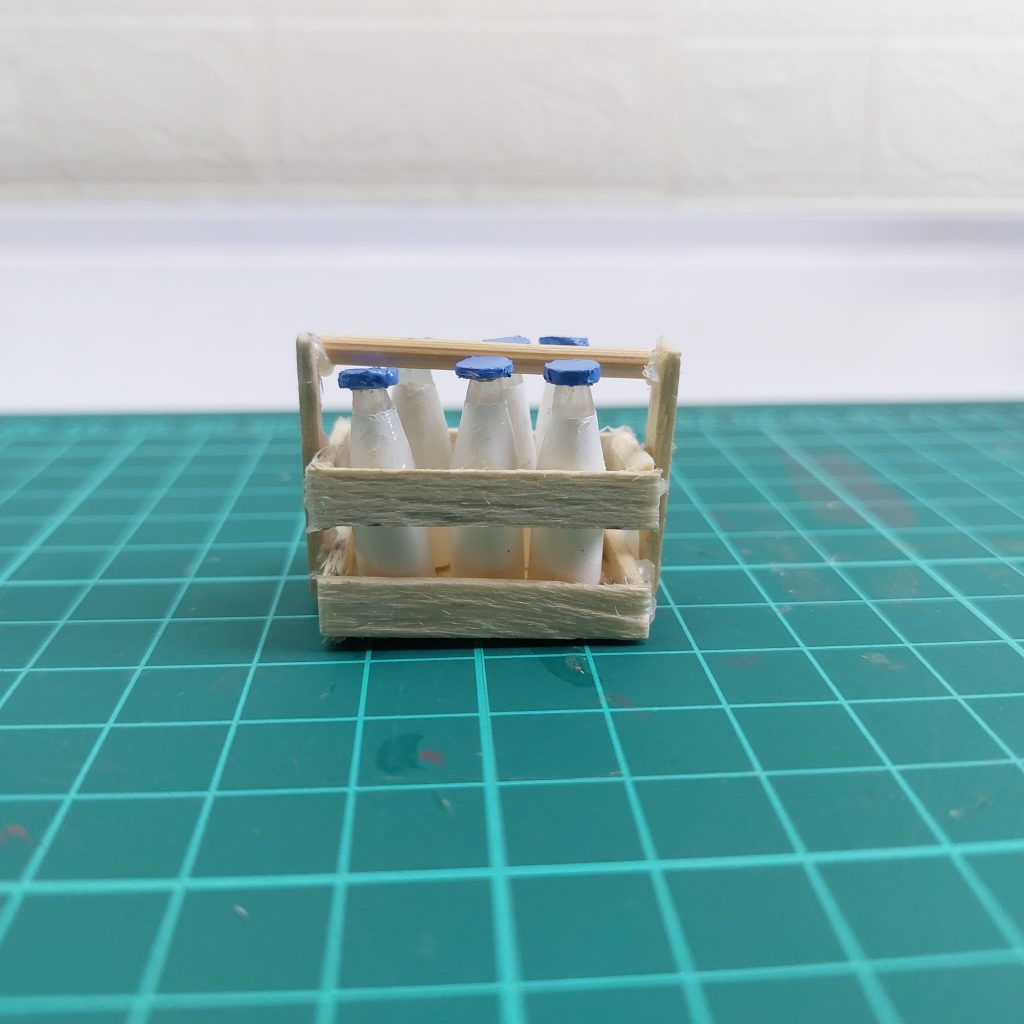
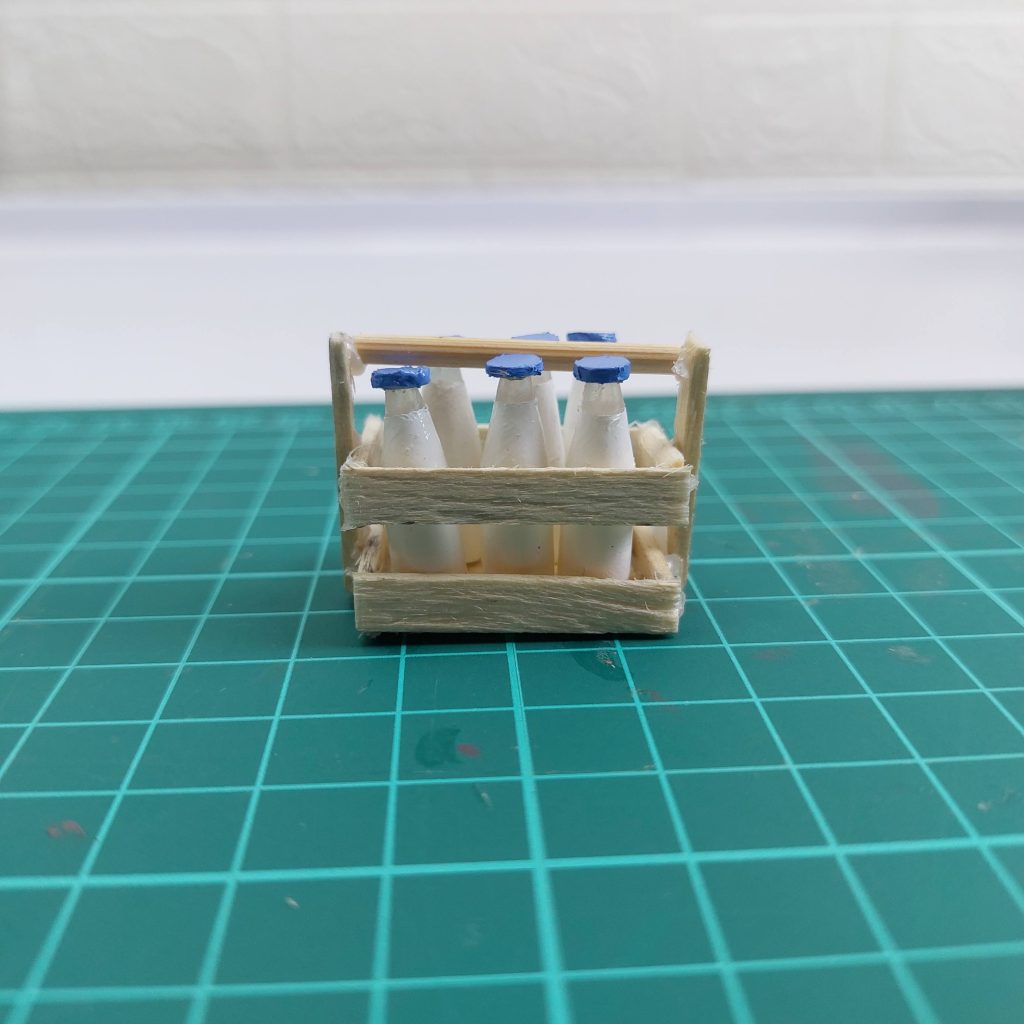
Do you remember the tutorial where I created a mini crate from popsicle sticks? In this tutorial, I’ll show you how to make tiny milk bottles for this crate 🙂
They’re made from simple, everyday materials like glue gun rods and tape, so no fancy supplies are needed.
Materials Needed
- Glue gun rod 7mm (cut into 2cm pieces)
- Cutter
- Nail polish or acrylic paint
- Tape
- Sandpaper
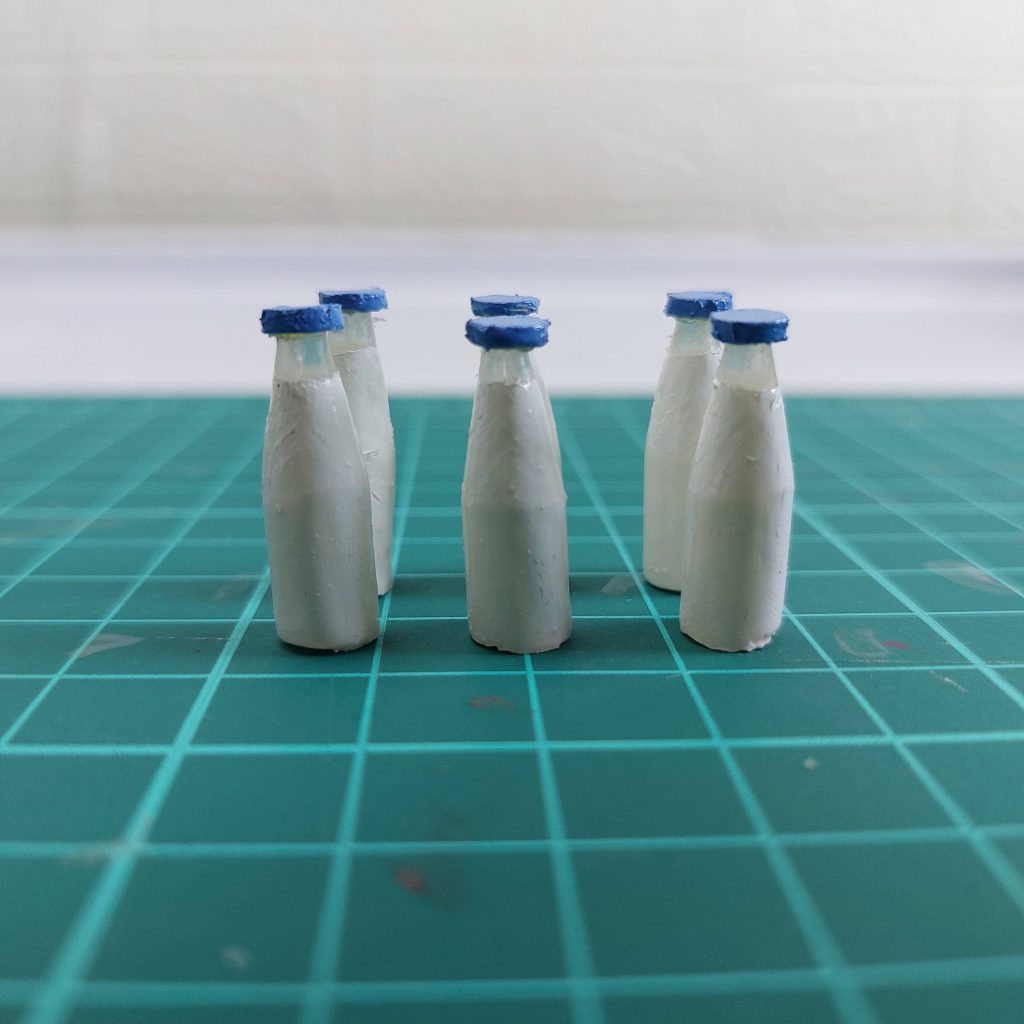
Steps to Make Miniature Milk Bottles
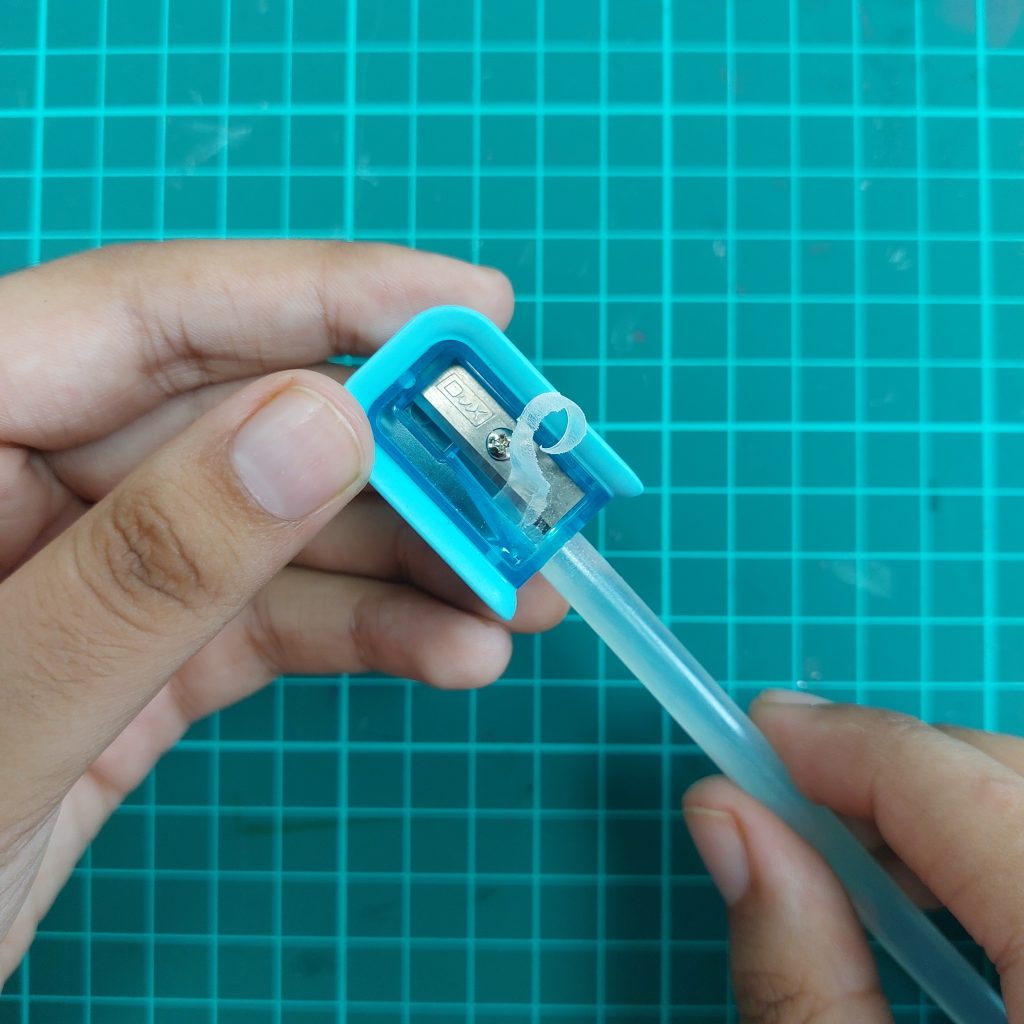
- Step 1: Shape the Bottle Neck
Take a 7mm glue gun rod and use a pencil sharpener to shave one end into a tapered neck shape.
- Step 2: Trim the Neck
Use a cutter to cut off the sharp point and refine the shape of the bottle’s top.

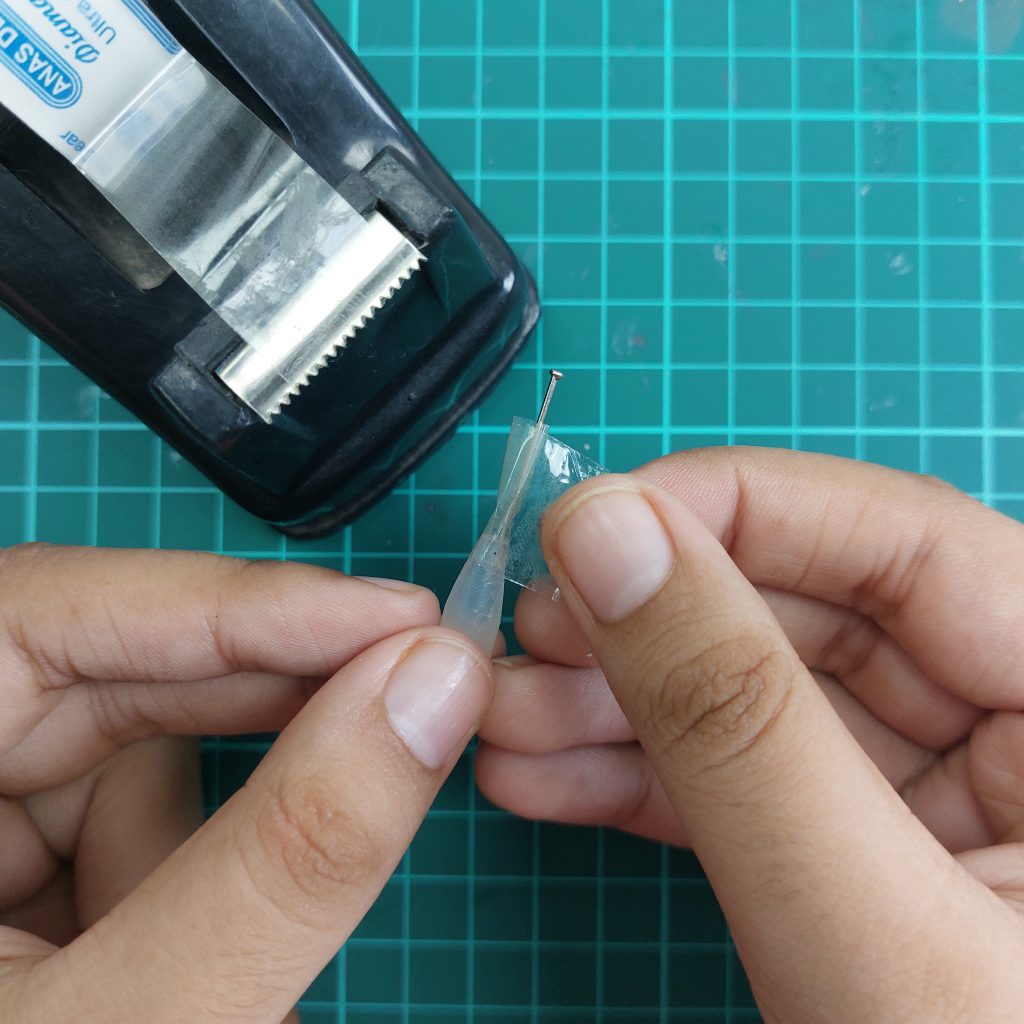
- Step 3: Add Tape for the Stopper
Wrap a small piece of tape around the neck to give the bottle a defined area where the cap will sit.
So you can move on with the painting.
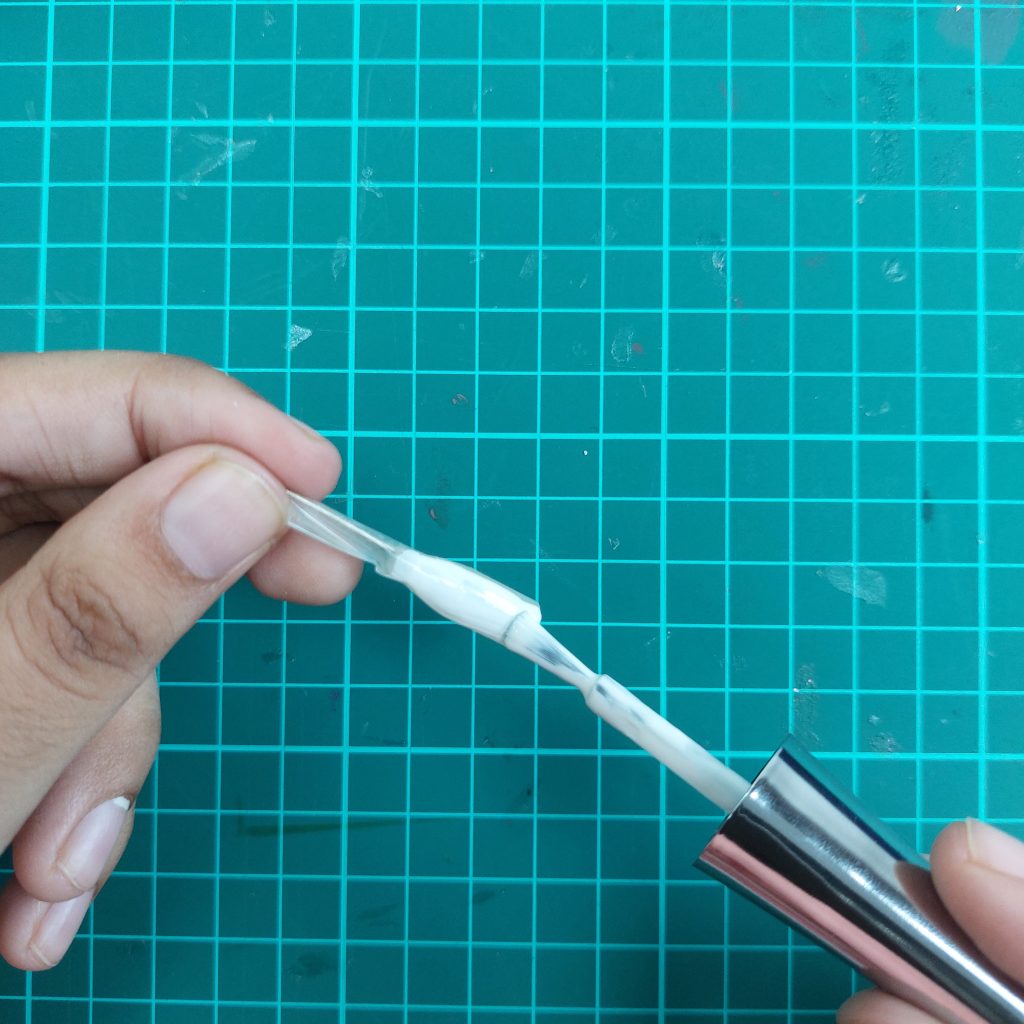
- Step 4: Paint the Bottle
Coat the bottle with white nail polish or acrylic paint. Allow it to dry completely before moving on.

- Step 5: Make the Caps
Slice thin discs from another glue rod to create bottle caps.

- Step 6: Smooth the Caps
Use sandpaper to gently smooth the edges of the discs so they look neat.

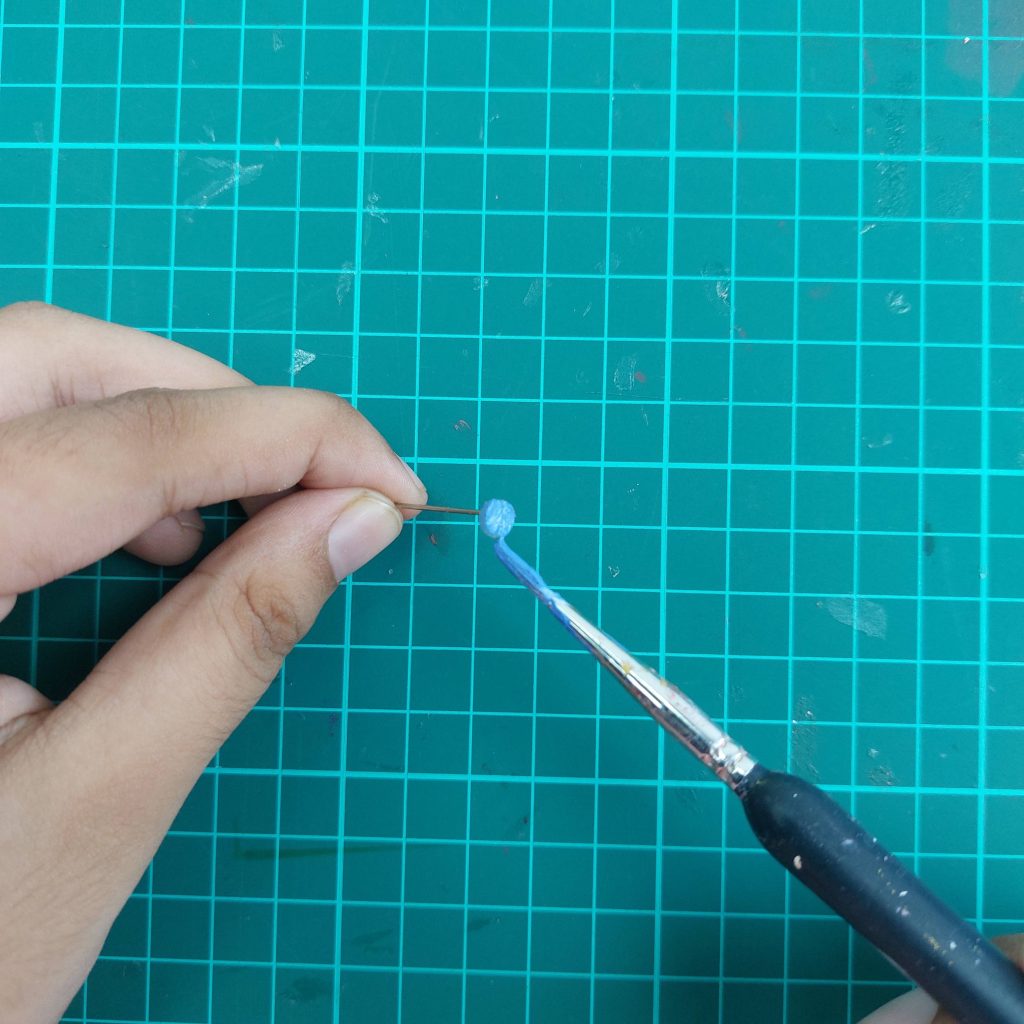
- Step 7: Paint the Caps
Paint the discs in a contrasting color, such as blue, to resemble classic milk bottle caps.
- Step 8: Glue the Caps On
Once dry, attach the painted caps to the tops of the bottles with glue.

- Step 9: Display the Bottles
Arrange your bottles in that small crate we did before or place them in your dollhouse kitchen for a realistic finishing touch.
DIY Miniature Frying Pan from a Bottle Cap
This project is quite similar to the one I shared in how to make realistic dollhouse accessories from recycled items, where I made a tiny frying pan from a blister pack.
But this time, we’re using a bottle cap instead! It’s a quick and easy way to make a sturdy little pan for your dollhouse kitchen.
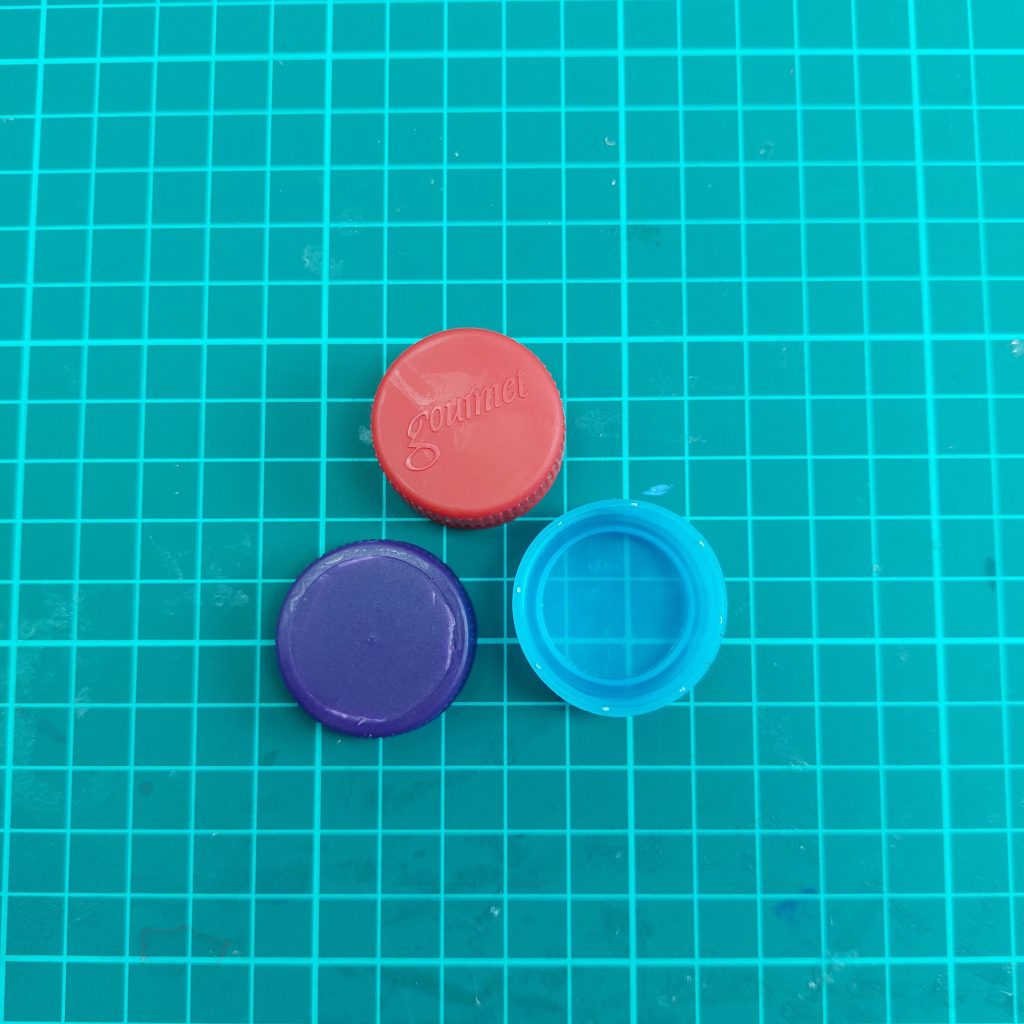
Materials
- Plastic bottle cap (any color)
- Short piece of a bamboo skewer or round stick
- Glue (super glue or tacky glue)
- Black and silver acrylic paint
- Paintbrush
Step-by-Step Tutorial
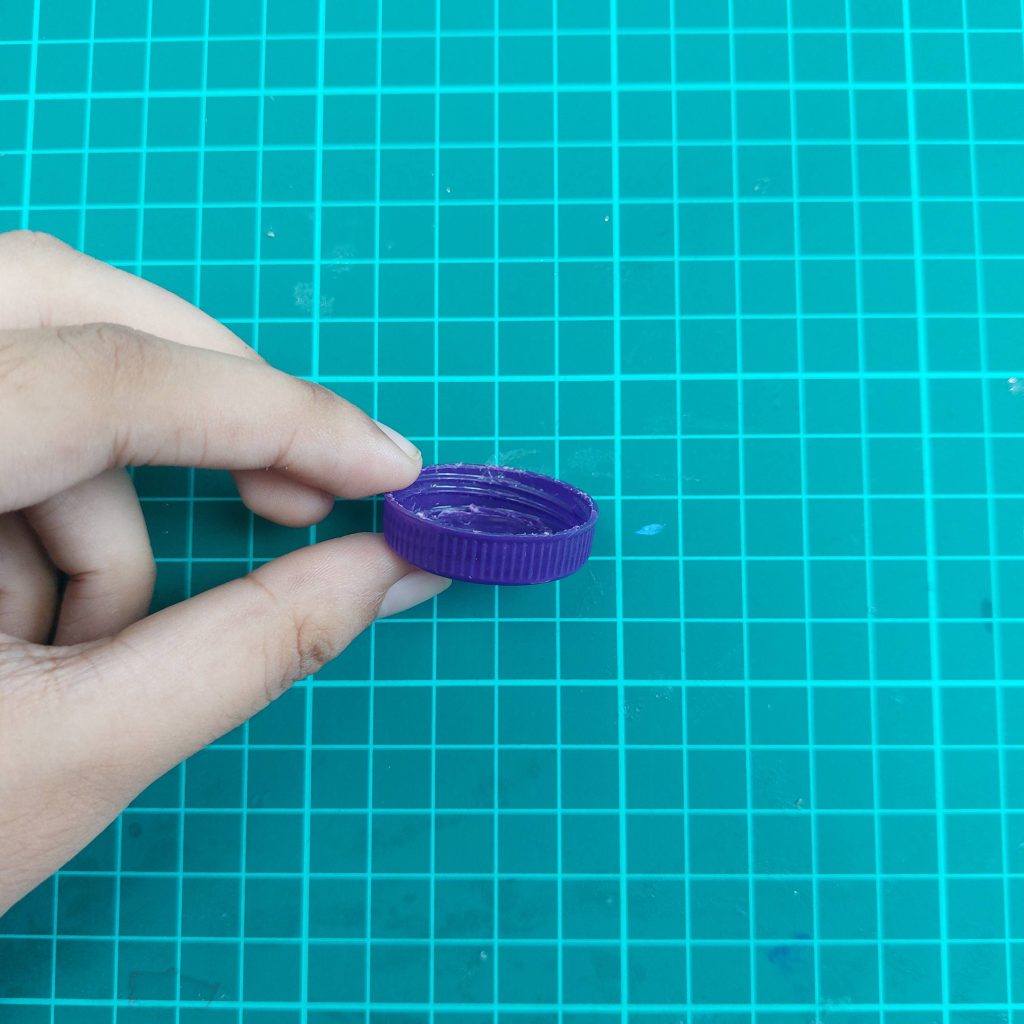
1. Choose your bottle cap.
Pick one that’s about the right size for your miniature frying pan — soda or water bottle caps work perfectly.
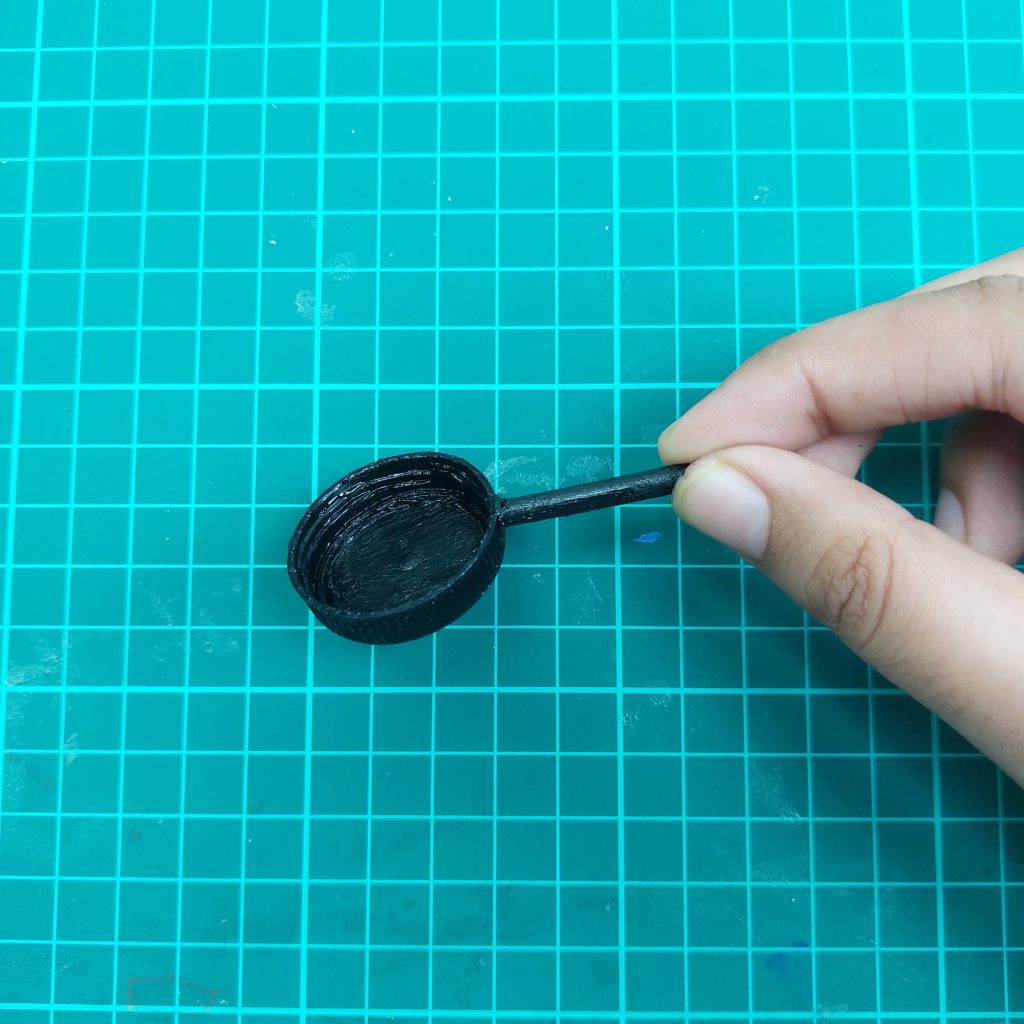
2. Cut the handle.
Cut a short piece of a bamboo skewer or a round stick for the handle. About 2–3 cm is usually enough for a 1:12 scale pan.

3. Attach the handle.
Glue the handle to the side of the cap and let it dry completely. You can press it slightly into the edge for a more realistic fit.

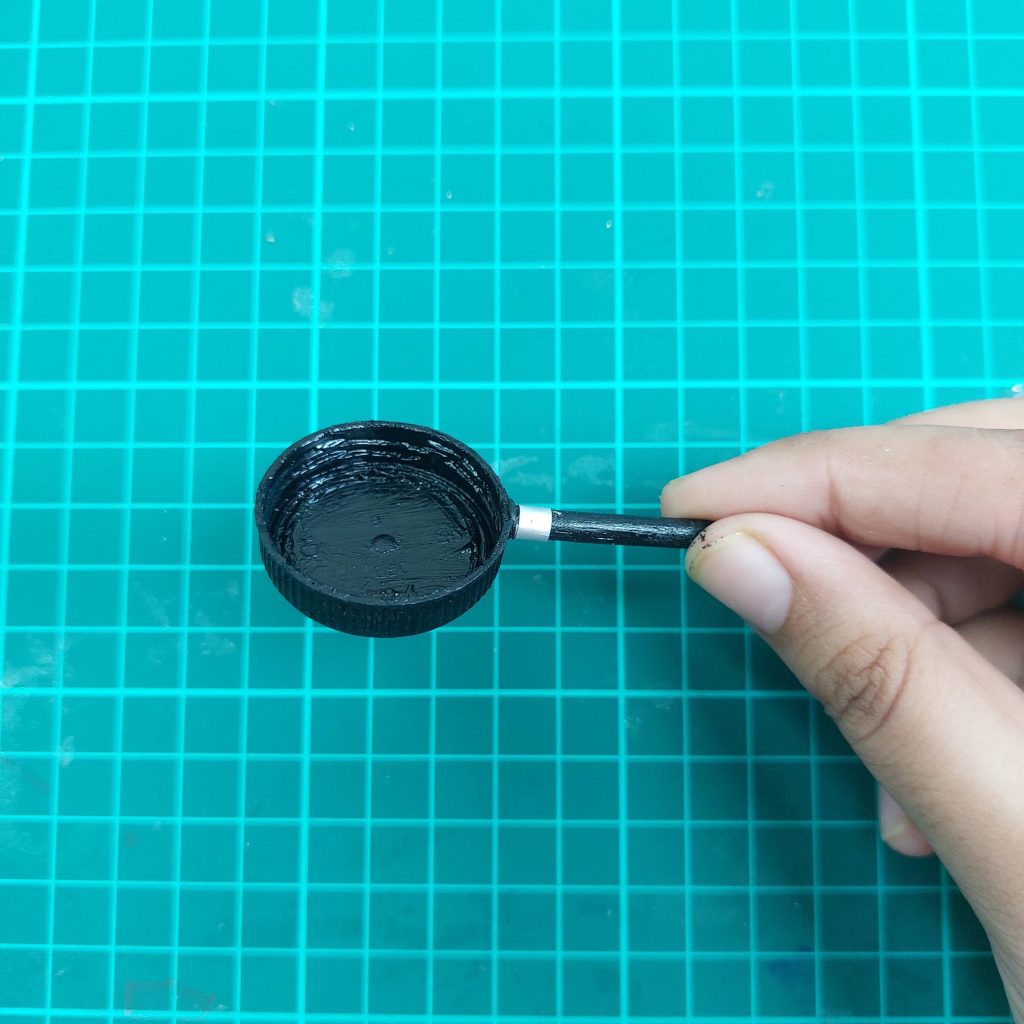
4. Paint everything black.
Once the glue has dried, paint the cap and handle with black acrylic paint. It’s easiest to hold the handle while painting the cap.
5. Add a metallic touch.
When the black paint is dry, add a small silver stripe where the handle meets the pan to mimic metal detailing.
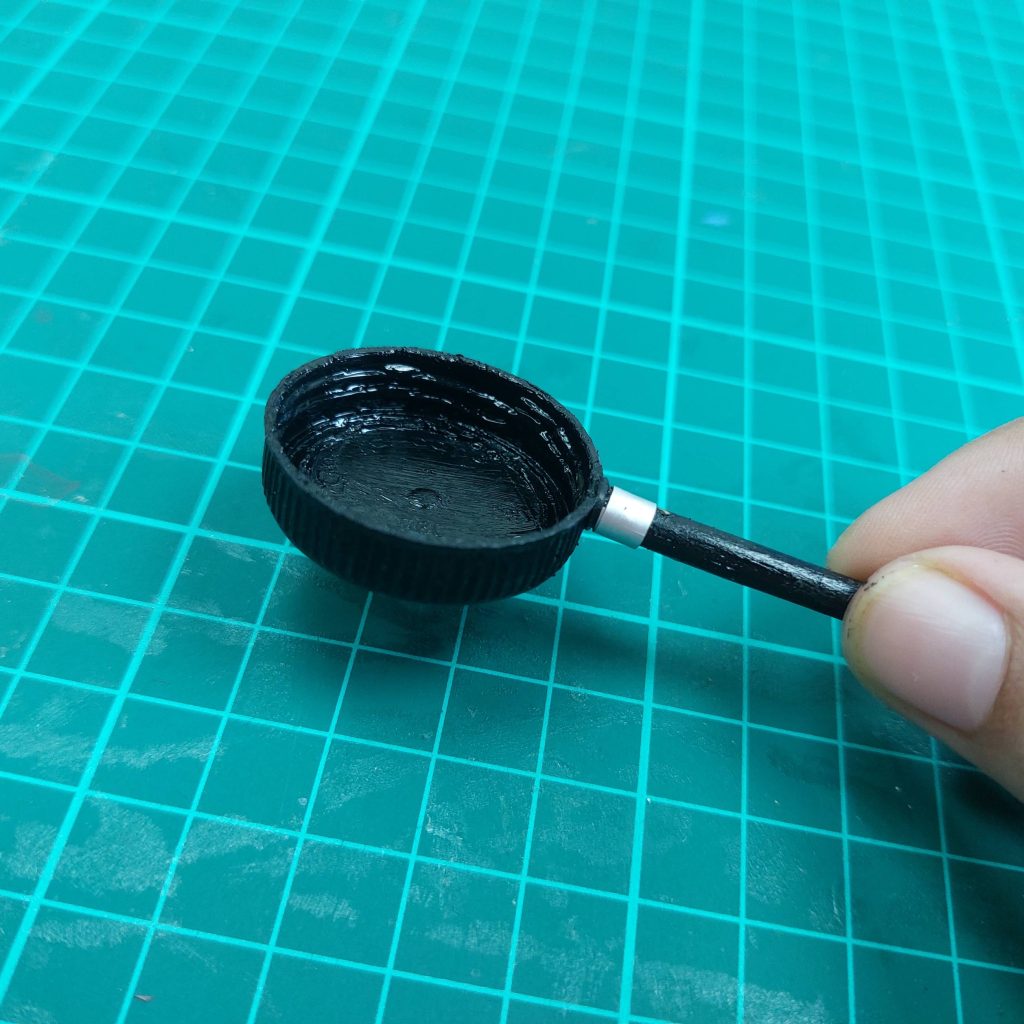
And that’s it — your tiny frying pan is ready for the dollhouse stove! It’s lightweight, durable, and made entirely from materials you probably already have at home.
Final Conclusion
Both of these projects show how easy it is to turn simple, everyday materials into miniature treasures for your dollhouse. With just paper, glue, and a bit of paint, you can make colorful mugs that add character to a tiny kitchen. And by reshaping glue sticks, you can create charming milk bottles that look great on their own or in a crate.
The best part? These projects cost almost nothing and can be done with supplies you likely already have at home.
If you enjoyed these tutorials, make sure to check out my other step-by-step guides on my blog, and don’t forget to subscribe to my newsletter for updates!
I wish you happy crafting!
Kind regards,
Lizzy

Hi everyone!
My name is Lizzy, and I am an amateur miniaturist obsessed with everything in the dollhouse and miniature world, ever since I was a teenager.
So far, I have created 2 dollhouse projects, a backyard shed and a miniature treehouse, tons of DIY dollhouse kits, and “hacked” some.
I also created a fairy garden, and lots of small and simple miniature projects on my YouTube channel. (mostly made from trash or everyday items).
I love to write as well about all things happening in the miniature world, hence the reason why I created this blog!
I wish you happy reading and crafting!
Lizzy


que hermoso todo